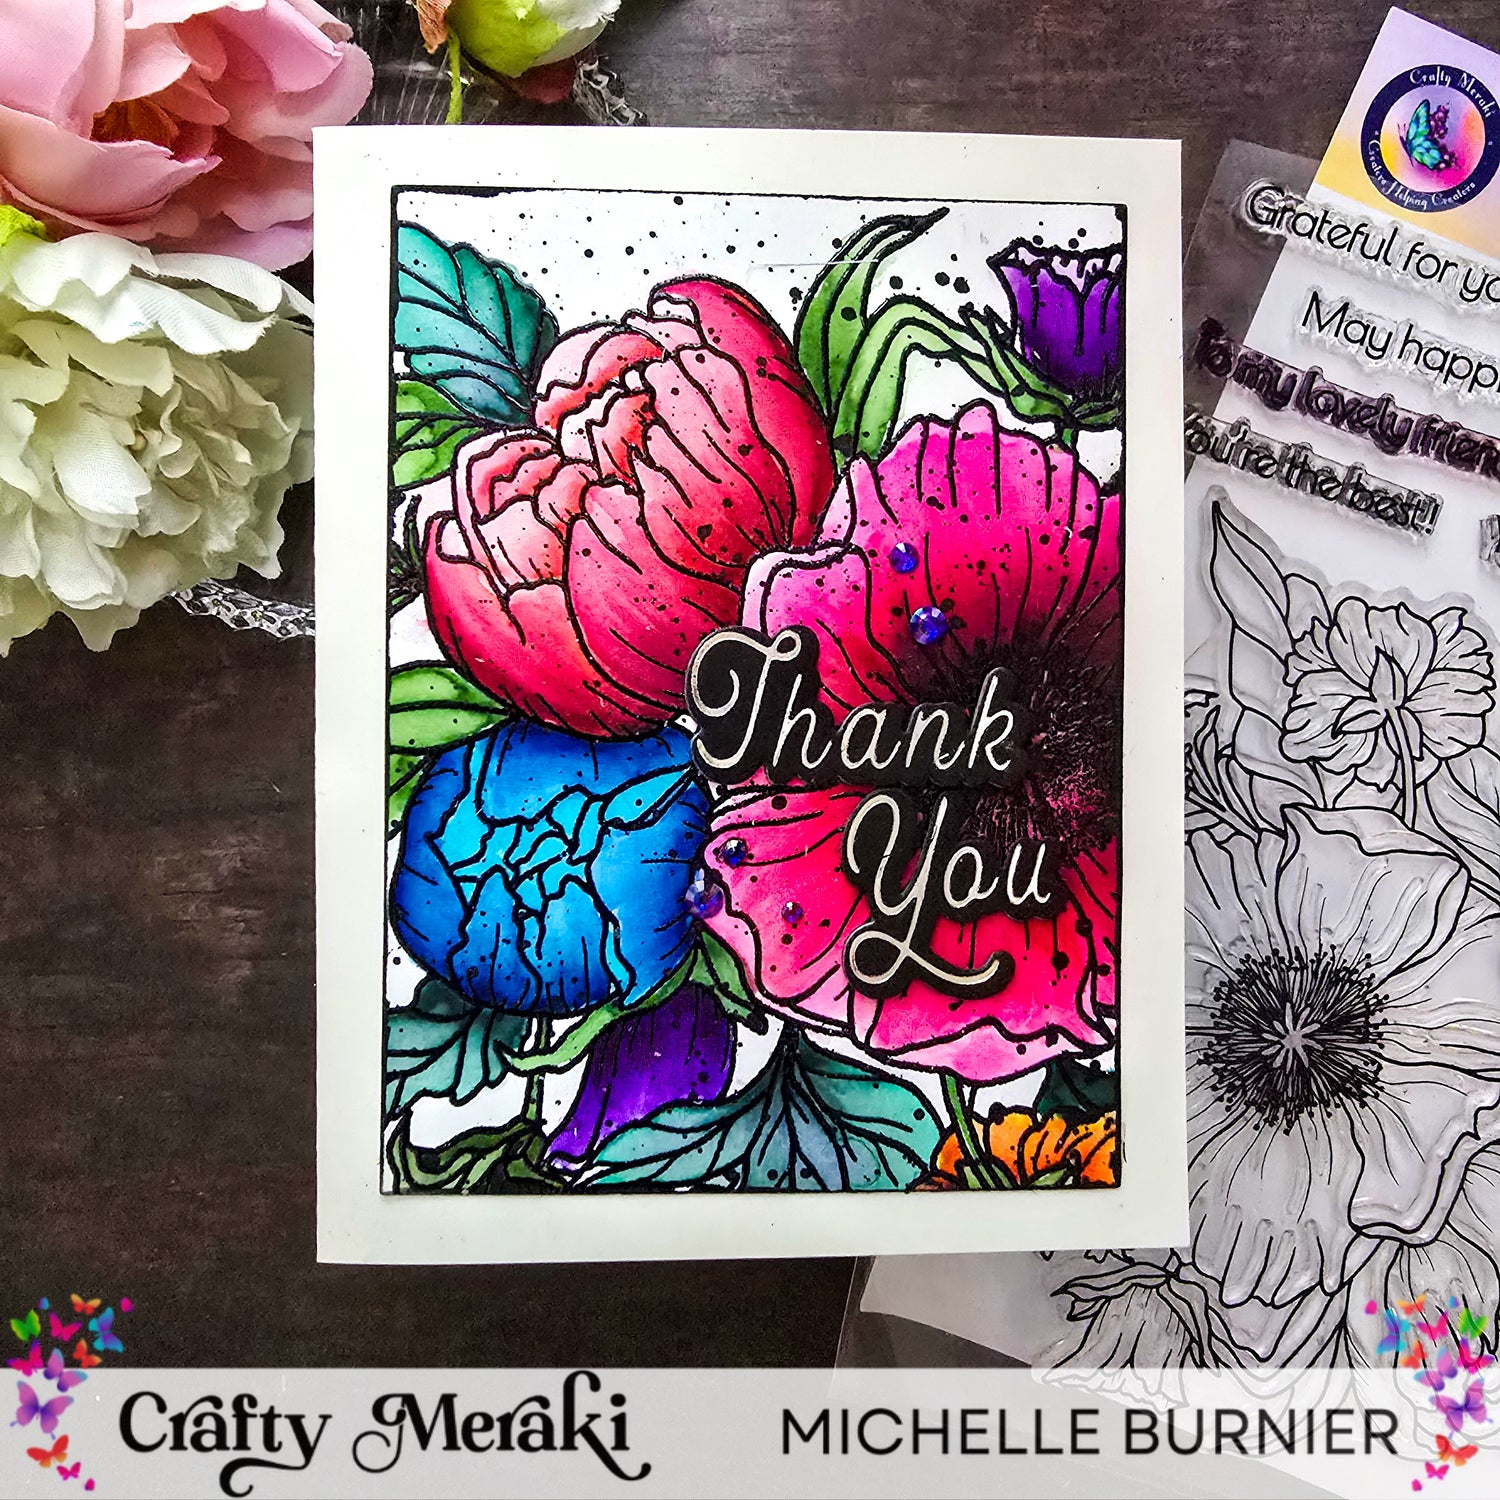
Hey Crafty Meraki friends....it's Michelle back with you on the blog today. Sometimes all you need is a beautiful bouquet of flowers to show your gratitude and say thanks. Today I am sharing just that...a beautiful and colourful floral bouquet to thank that special someone. Let's get started, shall we!

Start by heat embossing the floral image from the Bold & Beautiful Stamp Set on hot pressed watercolour paper, using WOW! Embossing Ebony Super Fine embossing powder. I used hot pressed paper as it has a smooth finish to it, so makes it easier to get a good stamped impression, compared to cold pressed watercolour, which has a textured finish to it.

Start adding colour to the images using Karin Brushmarkers Pro. I added a bit of colour at the base of the images and then added some water to move the colour around. Add the colour in layers. Start with a light colour and once dry, add layers on top for depth and a bit of definition. Be sure to allow one flower to dry before you start on the flower next to it, to avoid any bleeding of colour. For the final layer of colour, I simply used the blender pen to add the darker colour to the images.

Add some flecks using black gouache over the entire piece. Allow that to dry and cut down the piece to 3.5x4.75". Using the extra black gouache that is still on the work surface, take a small piantbrush and pick up some of the gouache. Run the paintbrush along the 4 sides of the floral piece, picking up more paint as needed. Be sure not to touch the edges until it is fully dry. Place it atop the jar of embossing powder to allow it to dry. Adding this black to the edges gives it a bit of a black border without the need for a mat of black cardstock under it.

Using gold foil, hot foil the Gilded Greetings Hot Foil Plate on black cardstock and cut it out using the coordinating die. To pop up the sentiment without using foam tape, cut out 2 more blank sentiments using the same colour cardstock or a dark one. I used some dark grey metallic cardstock to cut out the 2 extra ones. I didn't want to waste my black cardstock on the additional layers and this is a colour I will never use for the main sentiments or otherwise, so i thought it was perfect as my layers for it. Add the sentiment to the background and add this to an A2 cardbase. To finish it off, add a few of the Sapphire Night Dew Drops for some sparkle

And that's it! A simple floral bouquet, that is perfect for saying thank you to a special friend. I'm sure anyone would love getting this in the mail...and it's a bouquet that won't wilt or require watering.

Thank you so much for joining me on the blog today. I hope that I have helped to inspire you in some way and I wish you all the most wonderful day. Until next time, Michelle


4 comments
MRS DEJANA IVICA
TANGIBLE INFORMATION ABOUT LOAN PLANNING… THIS HAPPY NEW YEAR..
This is not a normal post that you see every day on the internet where people give fake reviews and false information about excellent financial assistance. I am aware that many of you have been scammed and that fake agents have taken advantage of those seeking loans. I will not call these normal reviews, I will call this situation where I live a witness to how you can get your loan when you meet the company’s requirements. It really does not matter if you have a good credit rating or government approval, all you need is a proper ID card and a valid IBAN number to be able to apply for a loan with an interest rate of 3%. The minimum amount is 1000 euros and the maximum amount that can be borrowed is 100,000,000 euros. I give you a 100% guarantee that you can get your loan through this reliable and honest company, we operate 24 hours online and provide loans to all citizens of Europe and outside Europe. They sent me a document that was checked and tested before I got the loan, so I invite anyone who needs a loan to visit them or contact them via email: michaelgardloanoffice@gmail.com
WhatsApp for Europe: +38591560870
WhatsApp for USA: +1 (717) 826-3251
After you contact them, let them know that Mrs. Dejana Ivica from Zagreb gave you the information. Seeing is believing and you will thank me later when you get a loan from them. I made a promise that after I get a loan from them, I will post the good news to everyone online. If you have friends or relatives, including colleagues, you can tell them about this offer and that it is happening.
Barbara Ignazio
GETTING BACK LOST, HACKED OR STOLEN CRYPTOCURRENCY // RESCUE TEAM RECOVERY COMPANY. Recovery of Lost Crypto; Binary options scam, Investment scams, Loans scam Etc. What happens after losing Bitcoin or a bank transfer to Fraudsters? You can choose to accept the loss and give the con artists your hard-earned money, or you can choose the second choice. As a result of your failure to stop the scammers, additional people will become victims, many of whom will most likely be your friends or relatives. You can watch testimonies of successful recoveries by this company both on youtube and other platformshttps://youtube.com/shorts/VCE7mcnb48I?si=3Ms34Ww1TuFzMBV1 https://youtube.com/shorts/VCE7mcnb48I?si=WguNgW8p8mJVLI2RImmidiately, you can contact bitcoin recovery professionals like Rescue Team Recovery Company at Email add (Rescueteamrecovery @ cyberservices. com) That will assist you in tracking and recovering your lost, scammed or hacked crypto currencies and band funds. The Rescue Team Recovery Company collaborates with law enforcement to help catch these con artists. You can proceed as long as you know the wallet address of the con artist or the receipts of the bank transactions. I wish you success. WhatsApp; +14706372676 Learn More; Eml: Rescueteamrecovery@cyberservices.com
https://youtube.com/shorts/VCE7mcnb48I?si=3Ms34Ww1TuFzMBV1
Leave a comment
This site is protected by hCaptcha and the hCaptcha Privacy Policy and Terms of Service apply.