Hey crafty friends! I can't express how much fun I've had this month getting to share amazing products from Crafty Meraki. It's been such a pleasure being a guest designer. I must give a huge thank you to Bindu for giving me this amazing opportunity.
Okay, let's create some texture!

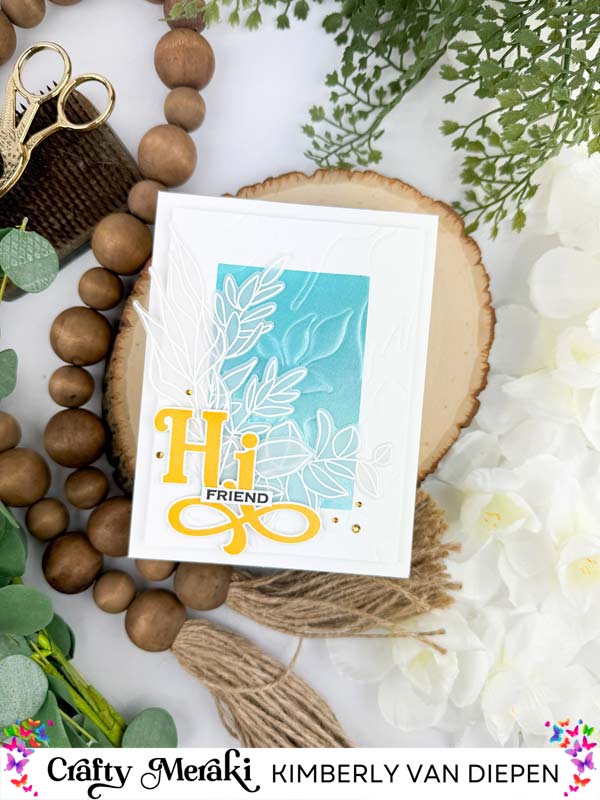
First,start with a white cardstock card base measuring 4 1/4 x 11", scored at 5 1/2". Next, using white cardstock (4 1/4 x 5 1/2") mask around the edge of the card front to create a rectangle center. Ink blend over the center rectangle using Peacock Feathers and Salvaged Patina Distress Oxide Inks or colors of your choice. Any inks will work. Using White Perfect Pearls Pigment Powder, brush over the ink blended area. Wipe any extra powder using a clean cloth, then remove the masking tape carefully.

Next I created an embossed image over the ink blended cardstock using the Evergreen Elegance Meraki Para-Dies and my die cutting machine.
To create an embossed image using a die cut machine, I used the silicone pad that came with my machine and followed the manual instructions for plate placement. This technique allows for the die cuts to leave an impression of the die cut images without cutting through the cardstock. In essence, the technique gives the same texture as an embossing folder. Make sure to trim the textured cardstock panel to 3 3/4 x 5".
Next, using embossing ink and WOW Opaque Bright White embossing powder, stamp and emboss the Evergreen Elegance stamp set onto Vellum cardstock. Die cut the image using the Evergreen Elegance Meraki Para-Dies. Place the leaf images at the left corner of the ink blended rectangle.
Using a yellow ink, stamp the Hi image from Meraki Moments Hi stamp set onto white cardstock, then die cutting the image using the coordinating die cut- Meraki Moments Hi. Stamp "friend" onto a scrap piece of white cardstock using black ink. Trim around the image closely, then attach to the Hi image using liquid glue. Attach the Hi image to the bottom left corner of the rectangle, over the vellum leaves using foam adhesive.

To finish this card, attach the card panel onto the card base using foam adhesive. Attach the Meraki Sparkle Gold embellishments to the card front.
I hope today's card inspires you to use your die cuts to create a texture background to your cards. The Evergreen Elegance Meraki Para-Dies is perfect for this technique as the die is ONE die cut plate. I love this! Thank you for allowing me to share my creativity with you this month. It's been such a pleasure to show case the amazing products Crafty Meraki provides. Much love, Kimberly!


2 comments
hannah
Dave allen
I lost my job few months back and there was no way to get income for my family, things was so tough and I couldn’t get anything for my children, not until a met a recommendation on a page writing how Mr Bernie Doran helped a lady in getting a huge amount of profit every 6 working days on trading with his management on the cryptocurrency Market, to be honest I was skeptical at first but I took the risk to take a loan, and I contacted him unbelievable and I was so happy I received a profit of $15,500 with an investment of $1500 within 7 days of trading , the most joy is that I can now take care of my family, i am just sharing my testimony on here. I don’t know how to appreciate your good work Mr. Bernie Doran, God will continue to bless you for being a life saver I have no way to appreciate you than to tell people about your good services. He can also help you recover your lost funds, For a perfect investment and good return on investment contact Mr Bernie Doran on Gmail : Berniedoransignals@gmail.com his telegram : IEBINARYFX or his whatsApp : 1 ( 424 ) 285 – 0682 tell him i referred you
Leave a comment
This site is protected by hCaptcha and the hCaptcha Privacy Policy and Terms of Service apply.