
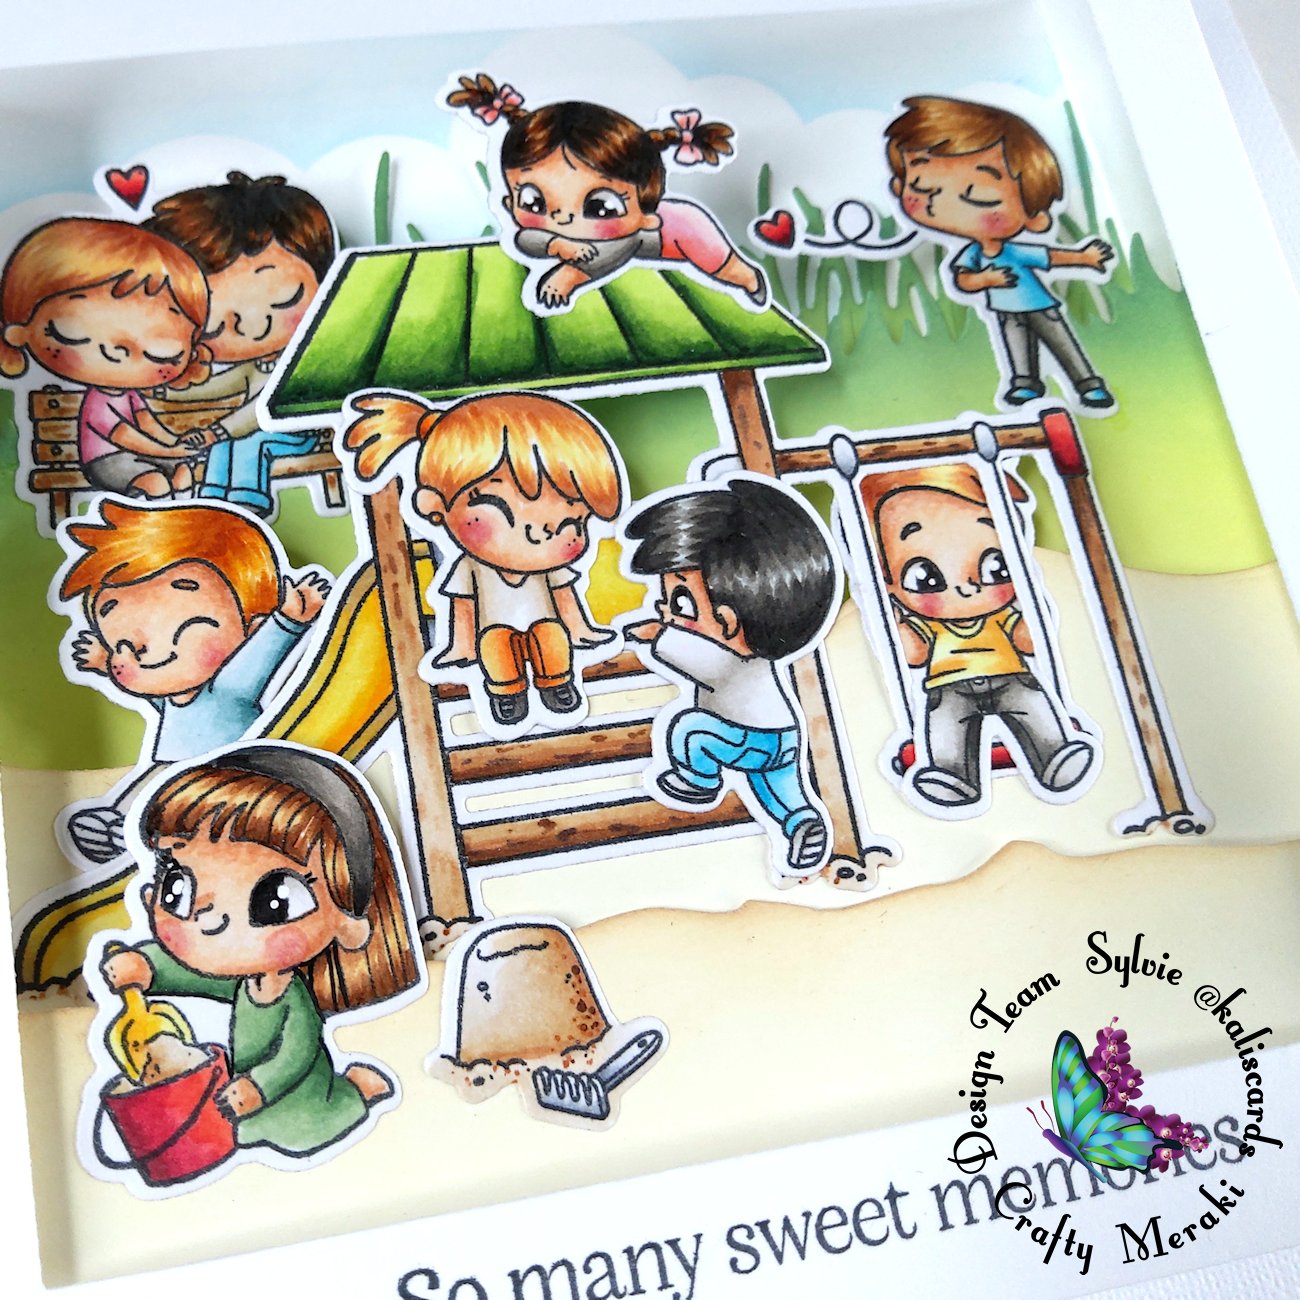
Today, I have this playful box card featuring the It's playtime stamp and die sets, released last month. I love the cuteness of these kids and I love how complete this set is; it has not less than 6 different kids and complementary images (teddy bear, birds, etc.), on top of a fun gigantic playset!

To create the box card, I die cut a first panel of 5 by 5 inches and with 4 by 4 square die, I created an opening in the center, leaving more space at the bottom for the sentiment which I stamped with black ink
I cut a second panel of the same height and 7 1/2 in width. I scored this panel at 1/4 and 1 1/4 on either sides. This panel will form the back and sides of the box card. With the My Favorite Things Cloud edge stencil, I'm blending Distress ink Salty ocean at the back
I'm also cutting 3 inside tabs for the scene, 5 1/2 in width and with a different height for each: 1 1/2, 2 1/2 and 3 1/2 respectively. I'm then running each tab through my diecutting machine with border dies to create a sand area (on the first two tabs) and a grass border (taller tab). The Heffy Doodle Slimline scenery dies would be perfect for these tabs

I'm then scoring the tabs at 1/4 of an inch on either sides. On the first two tabs, I blended Distress oxide Antique linen and Vintage photo, and on the taller tab, Twisted citron and Rustic wilderness
I also cut a piece of cardstock of 5 by 4 1/4 inches to create a grass border at the very back of the card box. Using the same grass border, I'm running that piece of cardstock through my die cuting machine. I then blended Distress oxide Twisted citron and Rustic wilderness and glued the grass border on my rear panel
I then stamped all the images from the It's playtime stamp set, colored them with Copic markers and used the coordinating dies to cut them out.

To assemble the box card, I'm starting by adding double-sided tape on the two 1/4 flaps on either sides of the rear panel (on the outside). Placing the rear panel and front panel side to side, I'm attaching the two panels together, having the rear flap taped to the inside of the front panel. It doesn't matter that you start from the right or the left, just go by the way that seems the most comfortable to you.
Then you will need to attach the 3 tabs to the side that follows the flap you just taped to the front panel. Start by the first tab, making sure you are fully aligned on the bottom of your box and straight. Then attach the second and third tabs. You need to attach these on one side only in this step.
From there, close the box, by folding the front panel onto the rear panel on the first score line which you already attached to the rear panel. Remove the release paper on the 3 tabs and close the other side onto them. Then remove the release paper of the other 1/4 flap, slide it below the front panel and press to adhere it. If you've been working on a flat surface, you shouldn't need to be particularly careful about alignment, as everything should fall into place naturally.
Depending on the scene you are creating, I would recommend you pre-attach the characters to the playset before adhering it to the tab. Then adhere the other images to your tabs. You may use thin strips of acetate to adhere any flying elements such as the butterfly or the birds to your tabs.
Hope you liked this tutorial. Thank you for stopping by and have a great crafty day!
Leave a comment
This site is protected by hCaptcha and the hCaptcha Privacy Policy and Terms of Service apply.