
Hello crafty folks,
Welcome to my first post as a design team member for Crafty Meraki! With the pandemic and the current situations, the world is in need of rainbows and sunshine. And what better way than to send someone, a bright cheerful rainbow-colored card, with a surprise popup?! So here we go! I have a fun popup card-in-a-box to share with you all today, for my very special first DT post :)
Watch the video to see how it looks in real!
This is how the card looks like when you take it from the envelope.
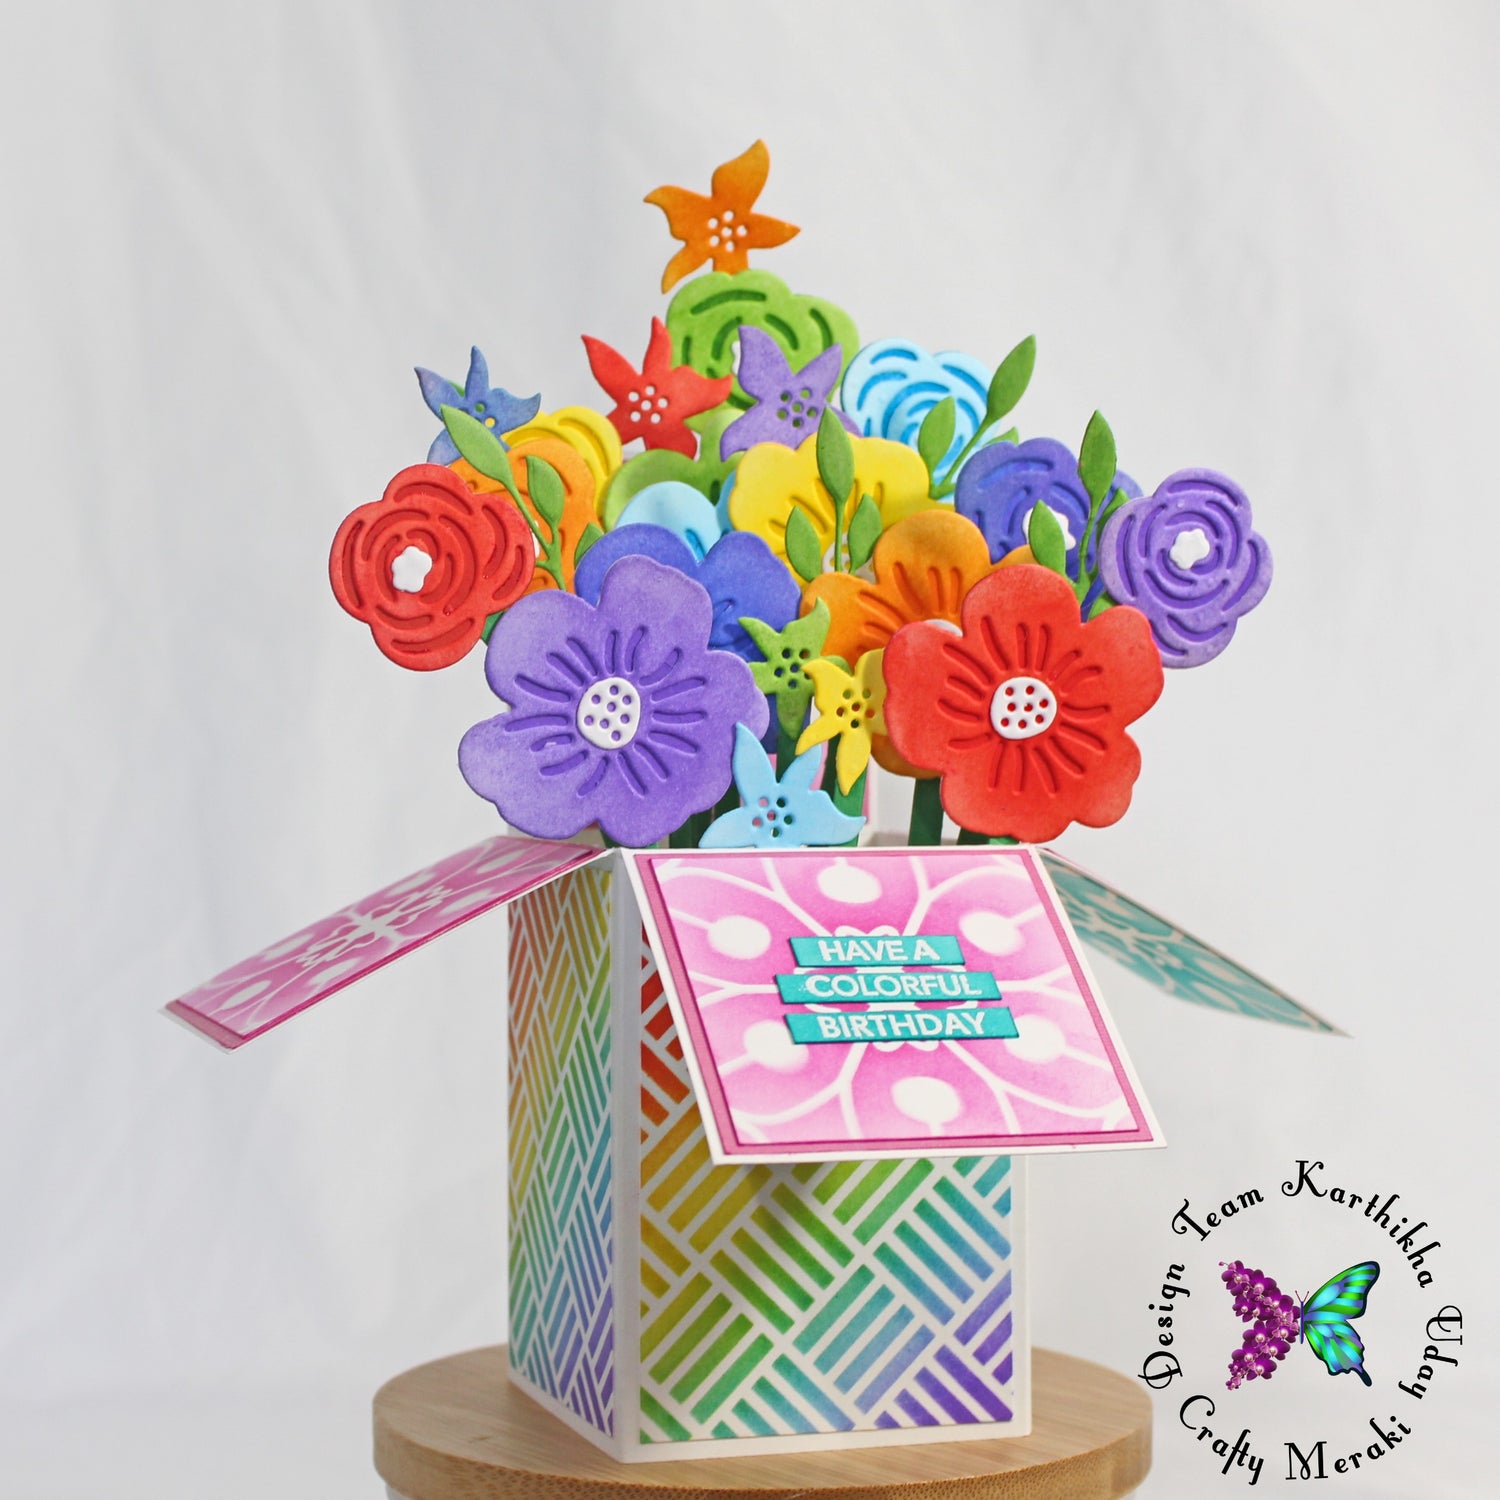
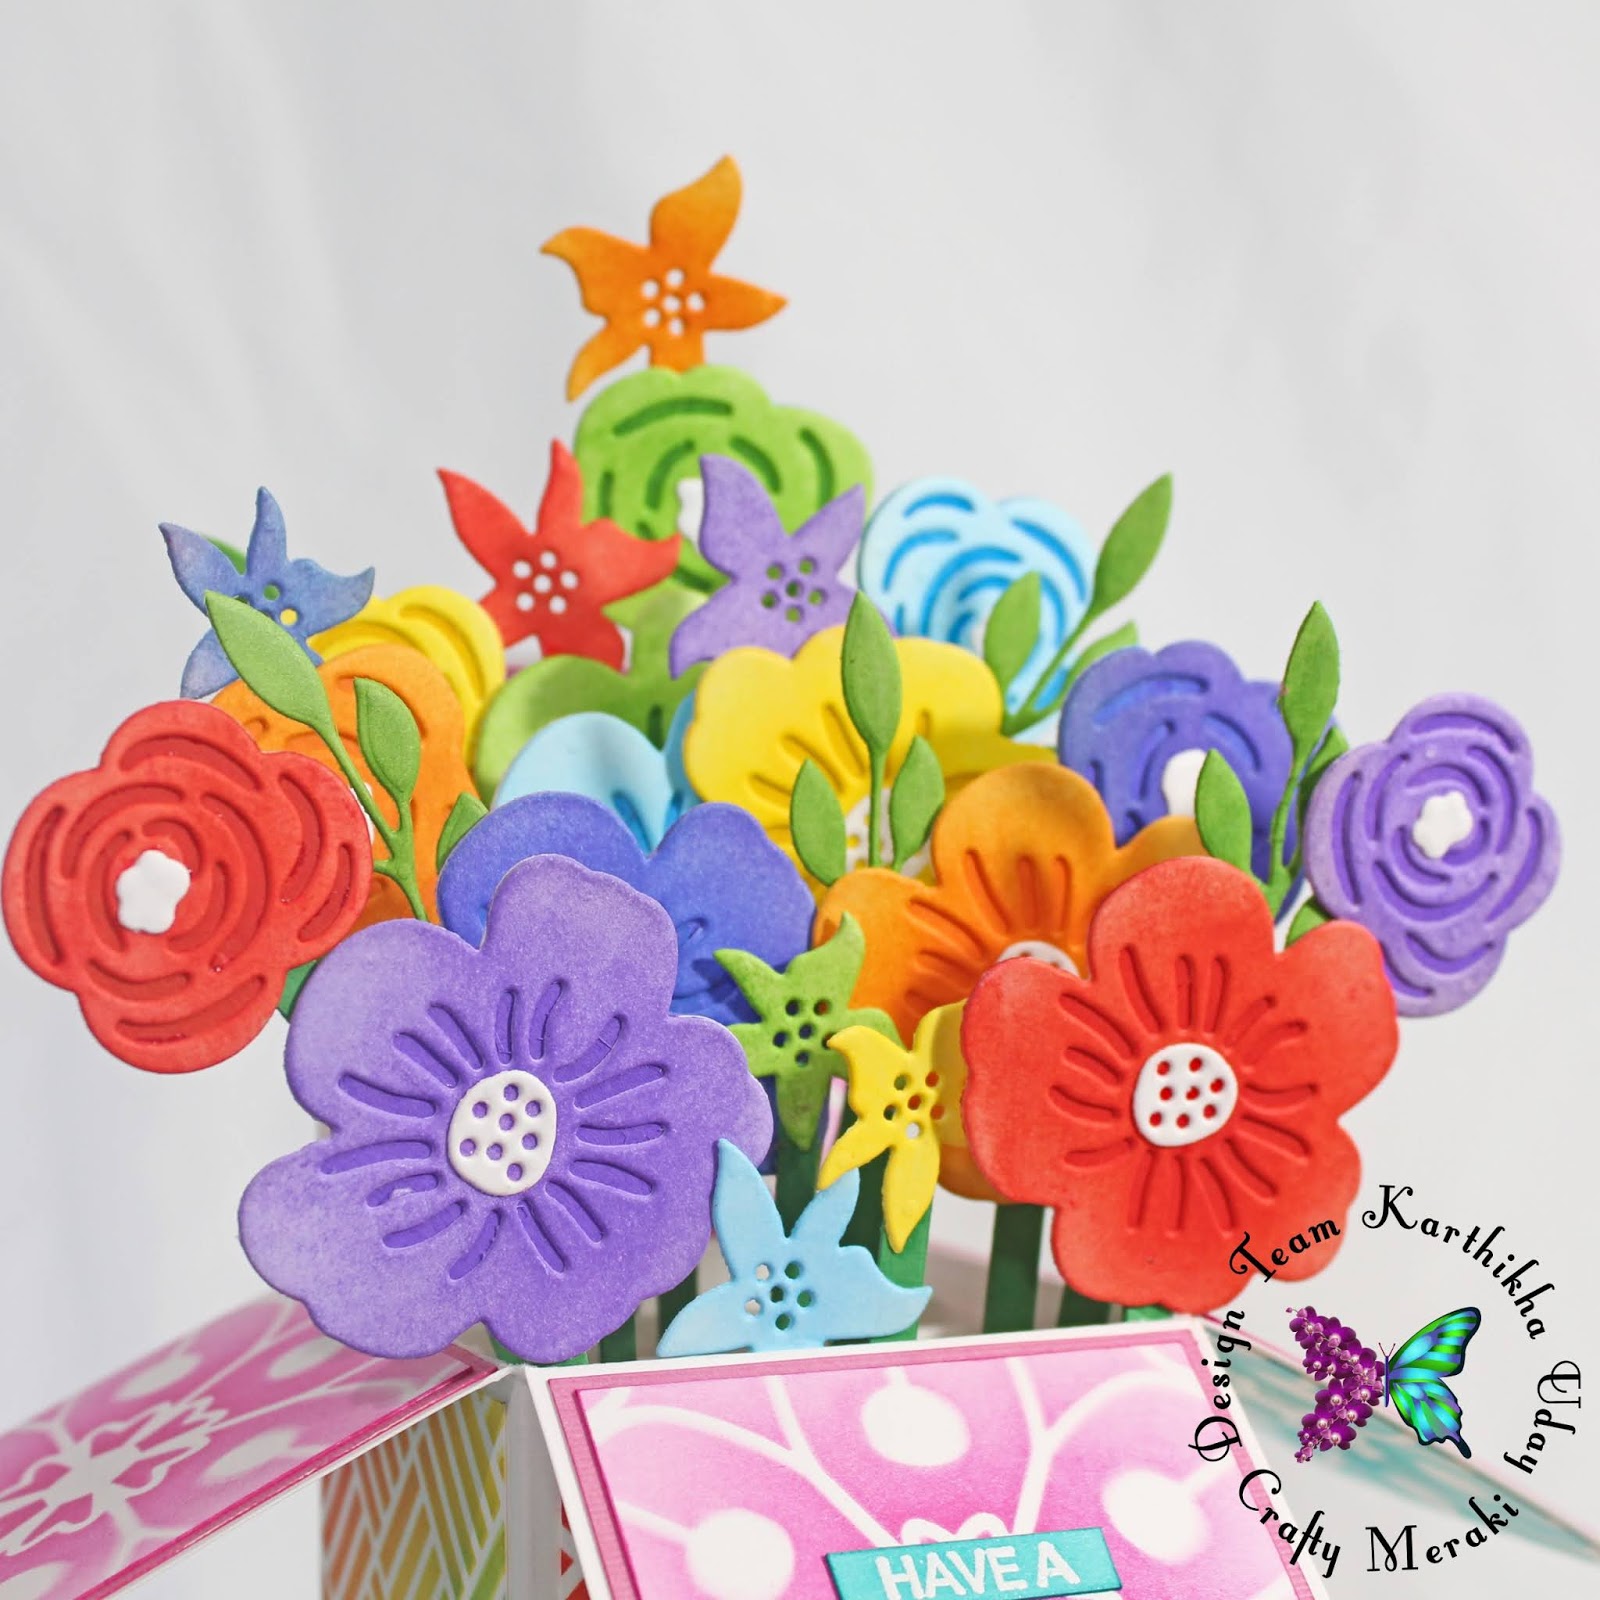
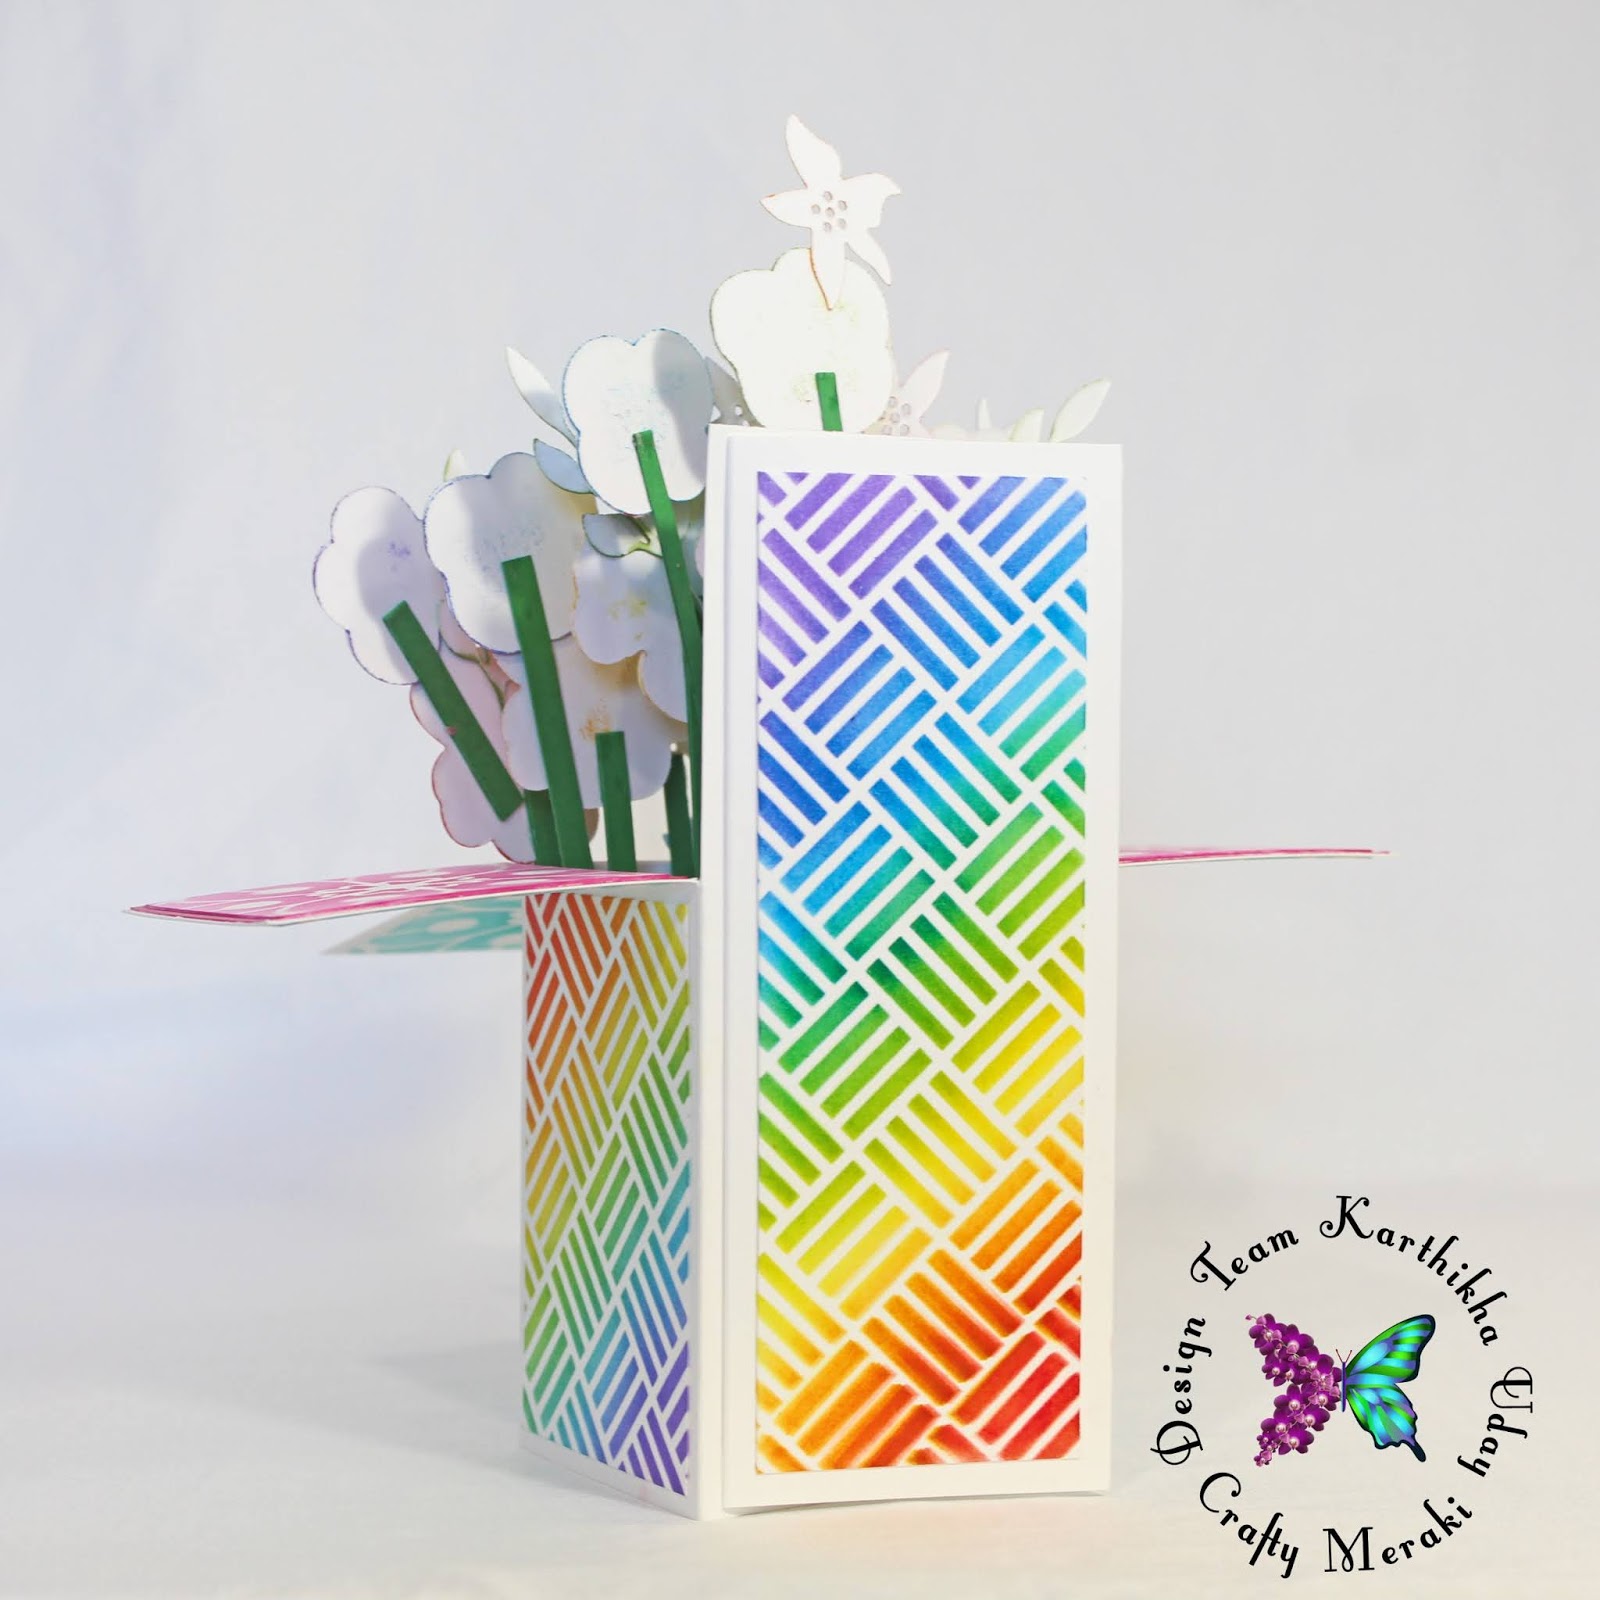
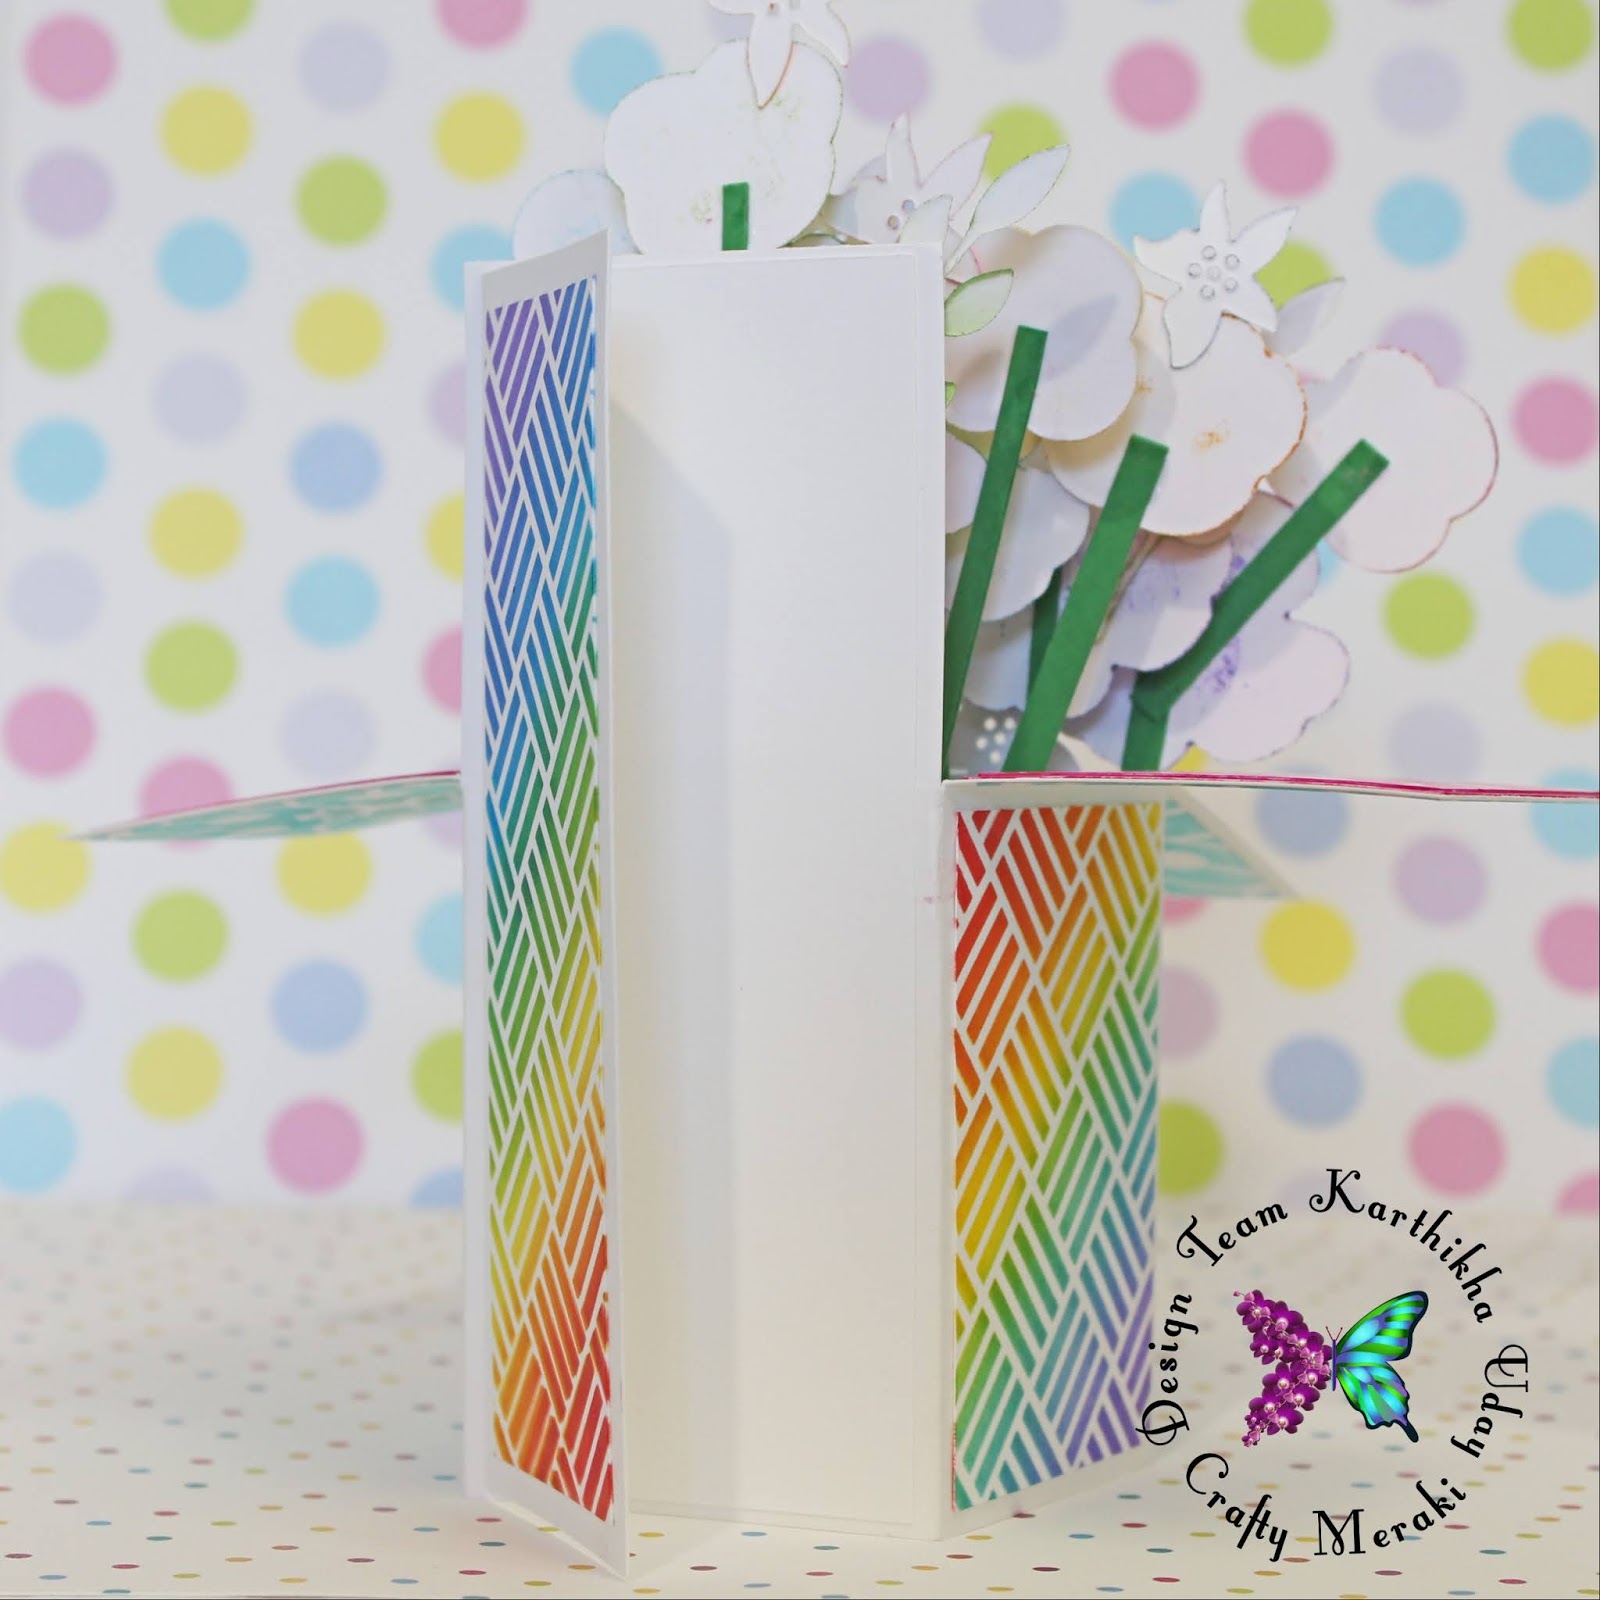
When you open the card and place it on the desk, the card pops out to reveal all those rainbow-colored flowers!

Isn't that a cheerful surprise? Hold on till the end, where I reveal one more surprise in this card! :) Now let me walk you through how I created the card.
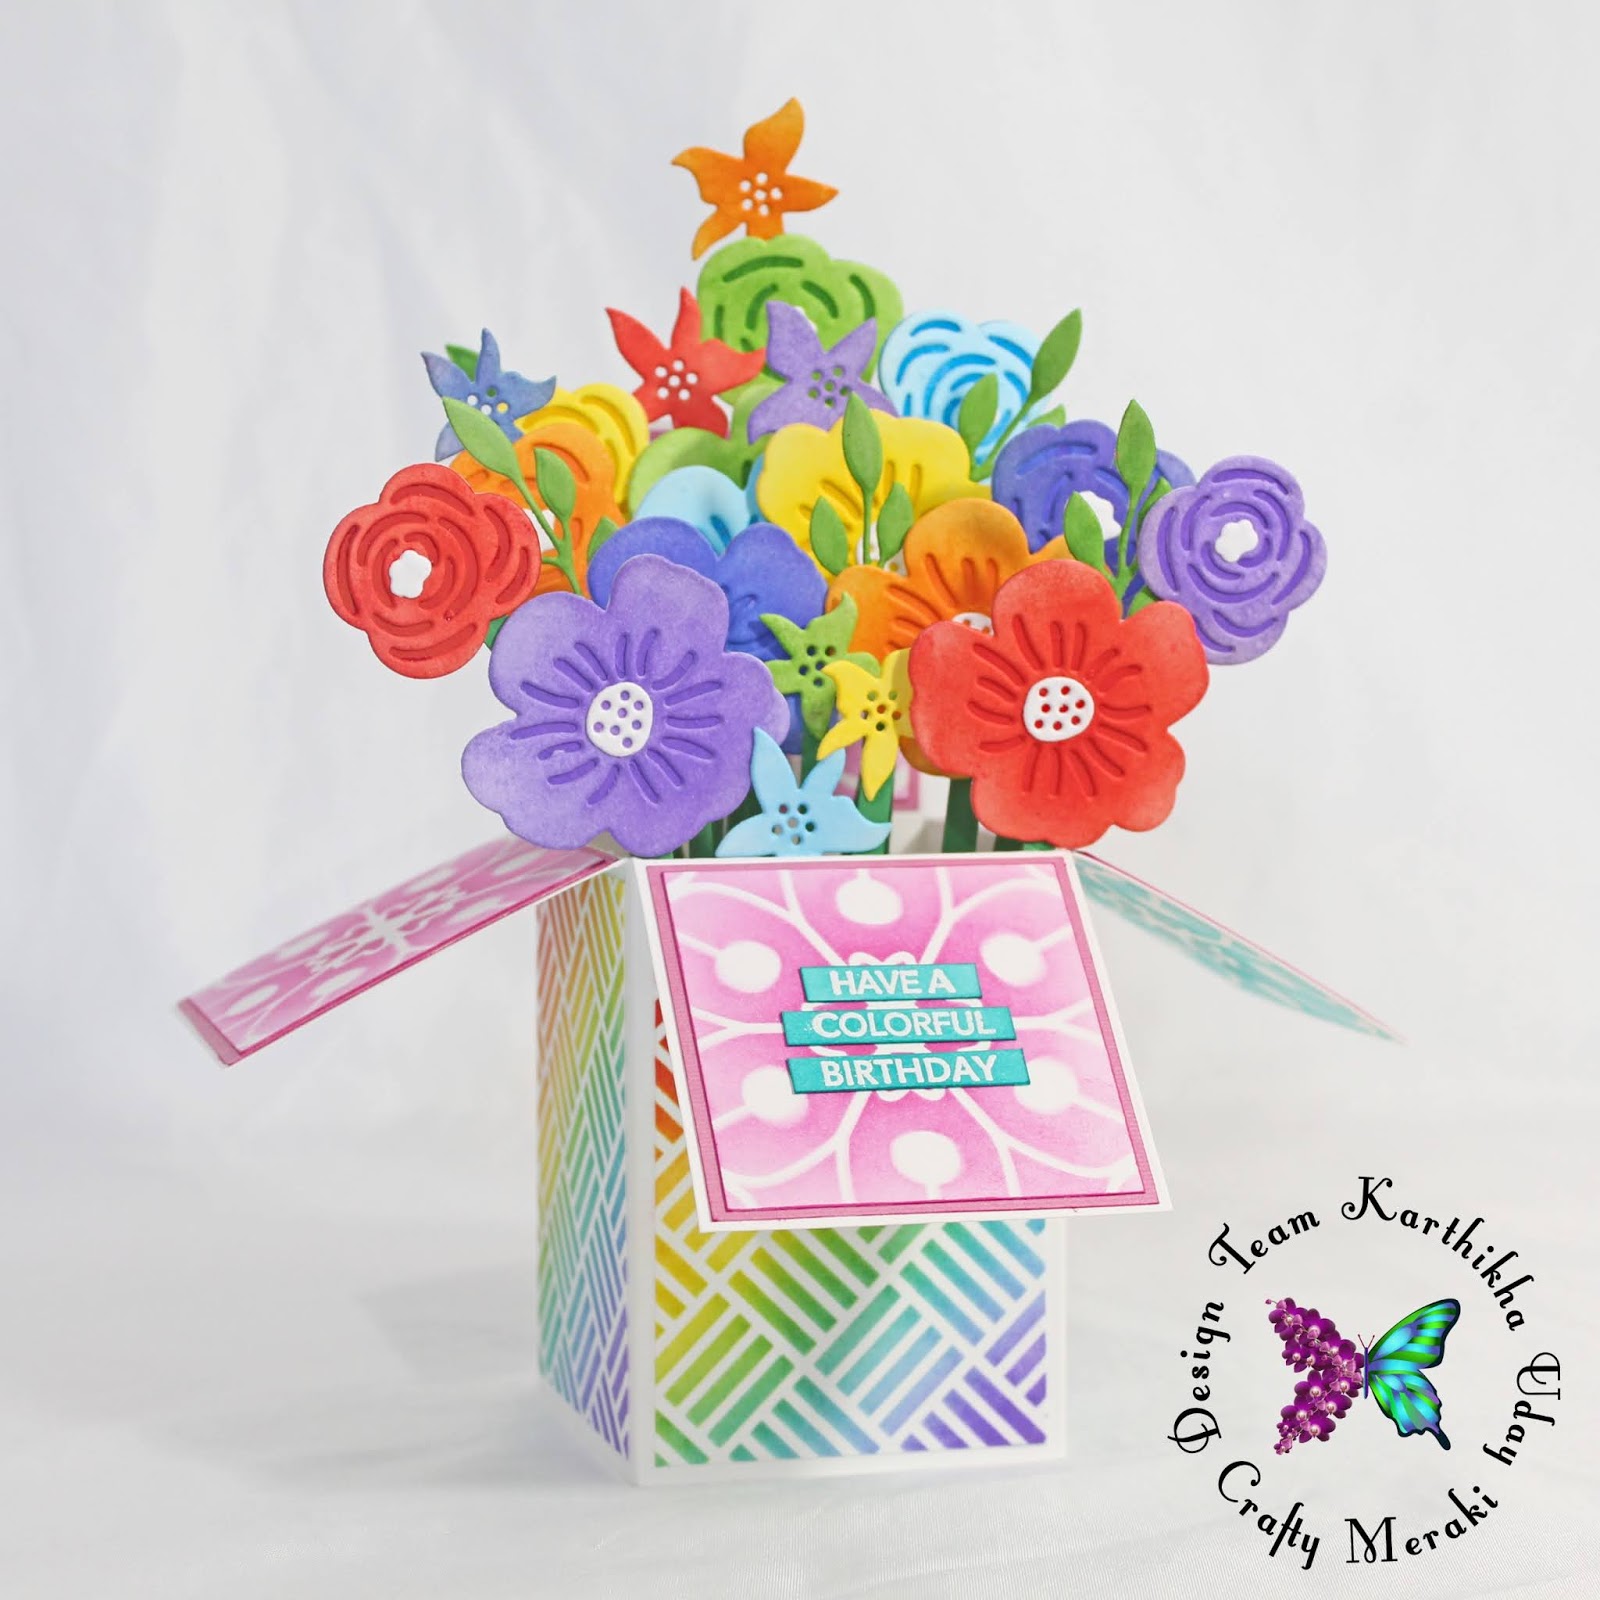
Step 1: Start with the flowers. I've die-cut multiple flowers from the Layered Floral Elements die set from Altenew. To be precise, I chose 3 flowers (one big, one medium, one star-shaped flower) and die-cut 7 of each, for each of the colors of the rainbow. Each flower has 2 layers to be die-cut.
Step 2: Color all the flowers. I've used blending brushes and inked up the flowers. For the inner layer, I went with the direct-to-paper technique to get a darker shade. For the outer layer, blend with the brushes. The inks I've used here are Distress inks from Ranger - Candied Apple, Spiced Marmalade, Mustard Seed, Mowed Lawn, Salty Ocean and Wilted Violet. I blended the blue and violet to get indigo shade.
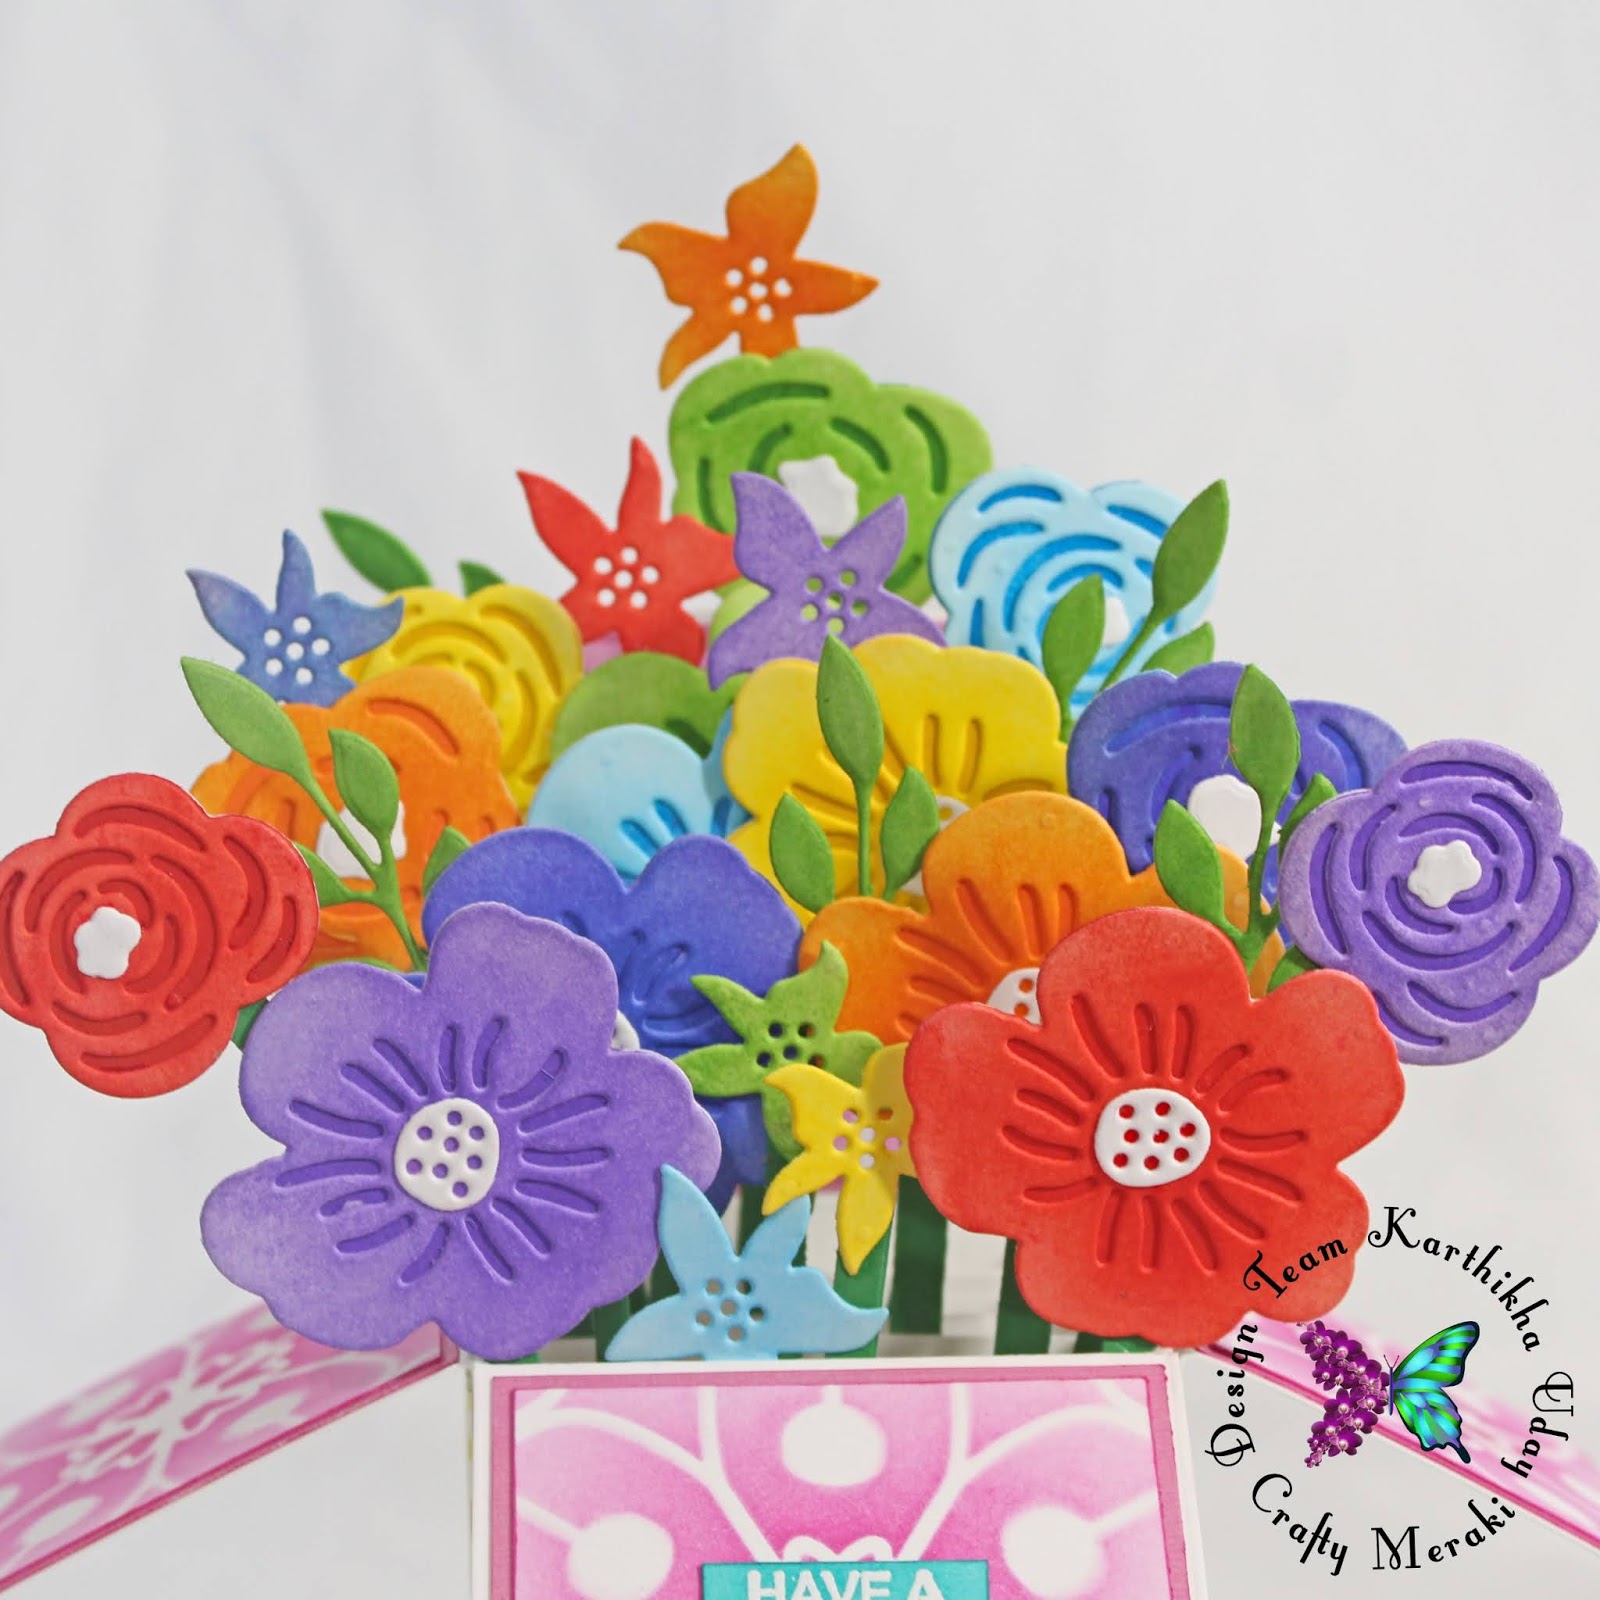
Step 3: Die-cut some leaves as well from the same set and blend with green color ink.
Step 4: Cut out long thin strips of green cardstock for the base of each flower and leaf. I doubled up the strips to make them stronger, so the flowers don't droop. Attach the stem to each flower.
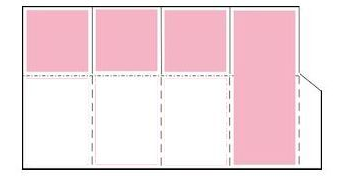
Step 5: Moving on to the base of the card, I used my own measurements. I started with a 6x10.5 inch white cardstock and scored at every 2.5 inch along the longer side. That gives 4 sections of 2.5 inches and 1 tiny section of 0.5 inch. The tiny section acts as the flap to hold the card shape. Along the shorter side, score at 2.5 inches. The top section of the card would be 2.5 inches tall and the bottom base would be 3.5 inches tall. Here is a rough template from the internet, to understand the base.
Step 6: For the inner layers in the base, I used strips of 3.5x0.5 inches, scored on the left and right at 0.5inches. Fold along the creases and attach to the inside of the card base along the flaps.
Step 7: Arrange the flowers along the different layers of the box as per your wish. I've made sure they are colorful and adjusted the heights of the stem accordingly. Adhere using strong glue.
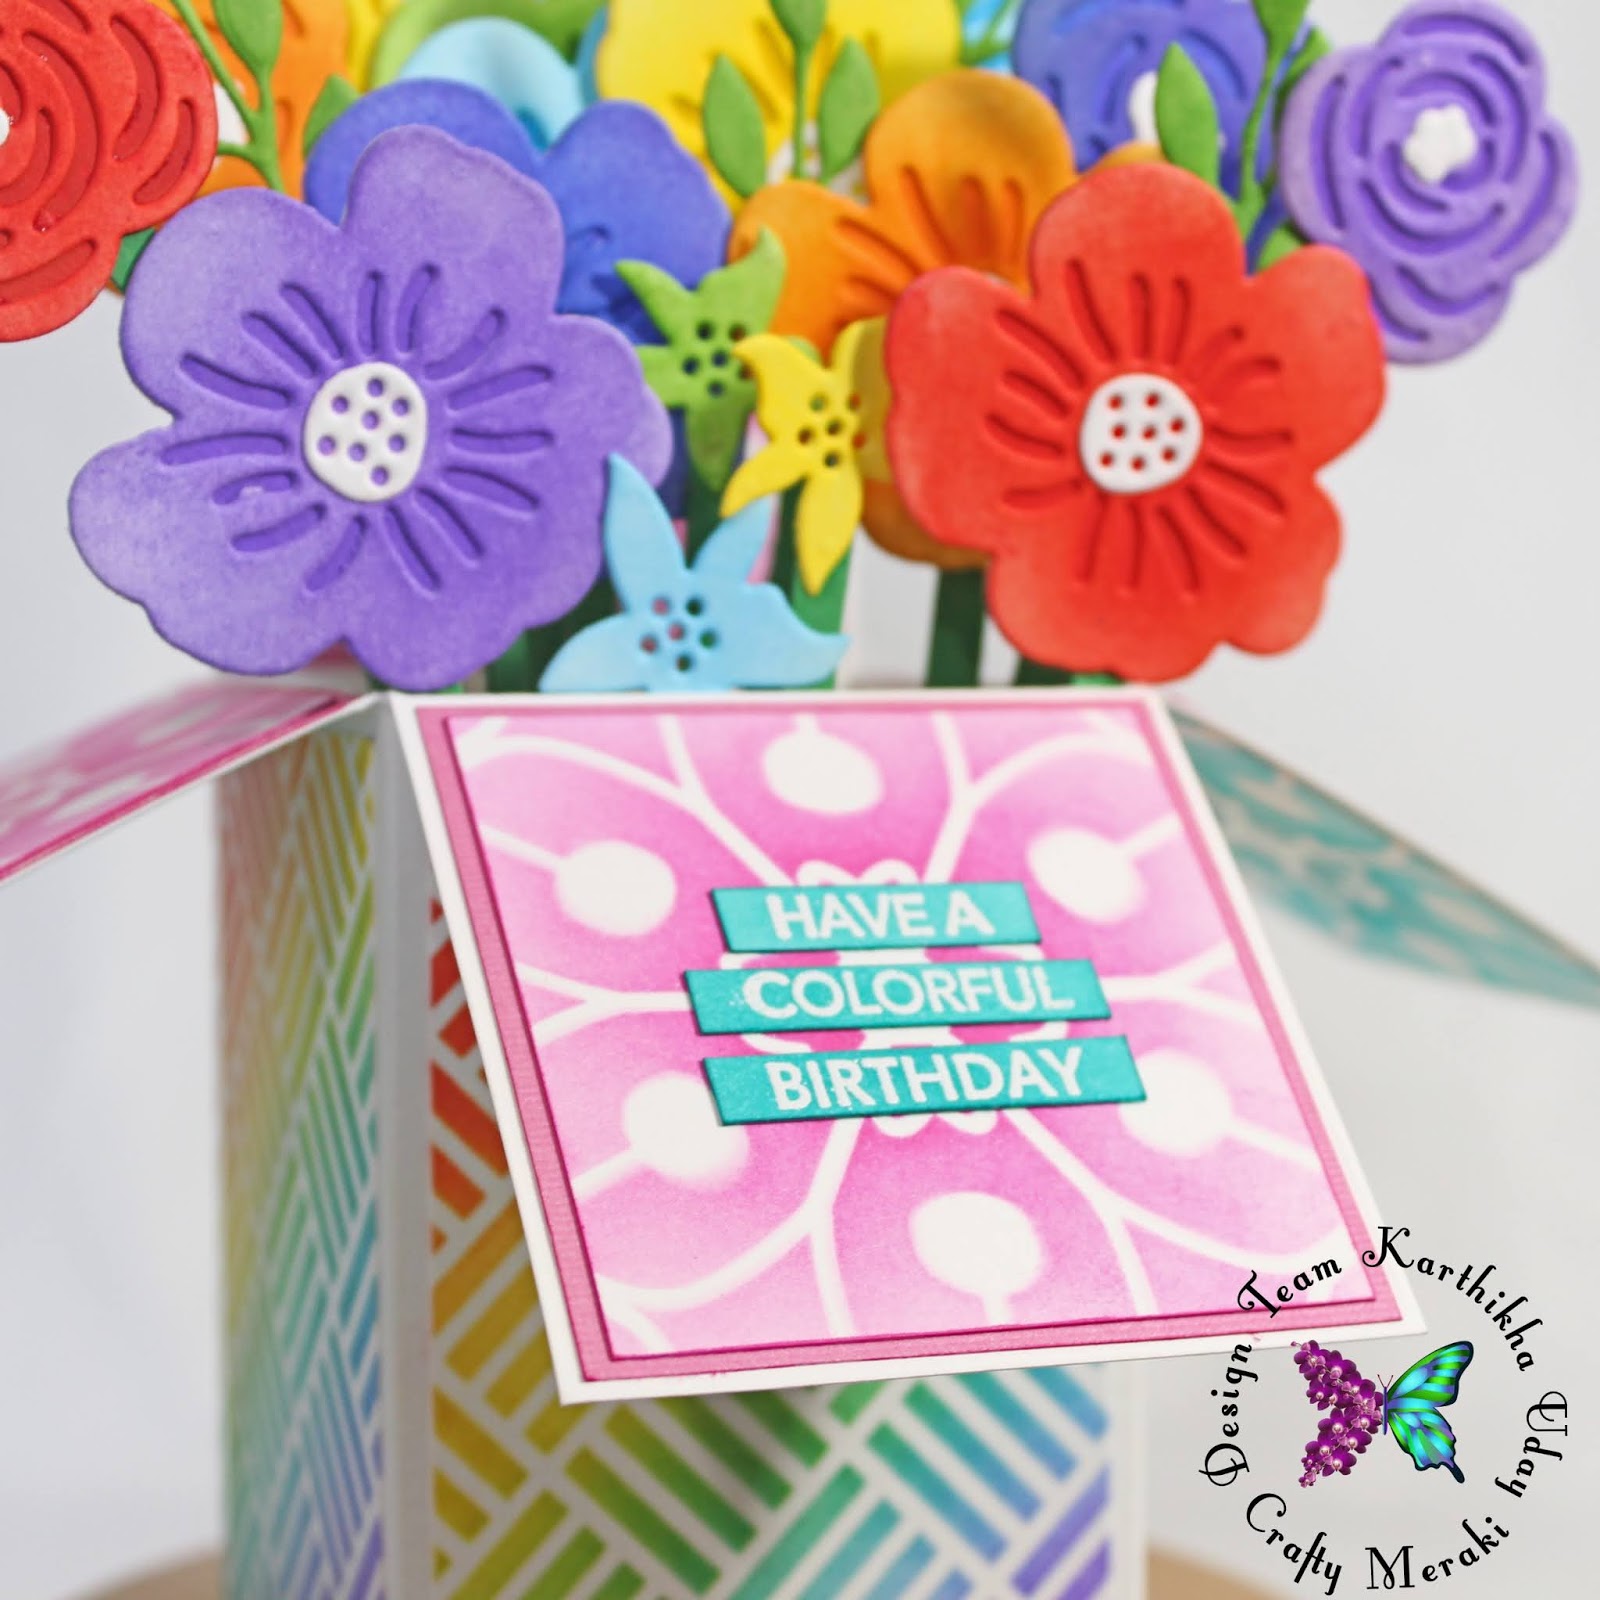
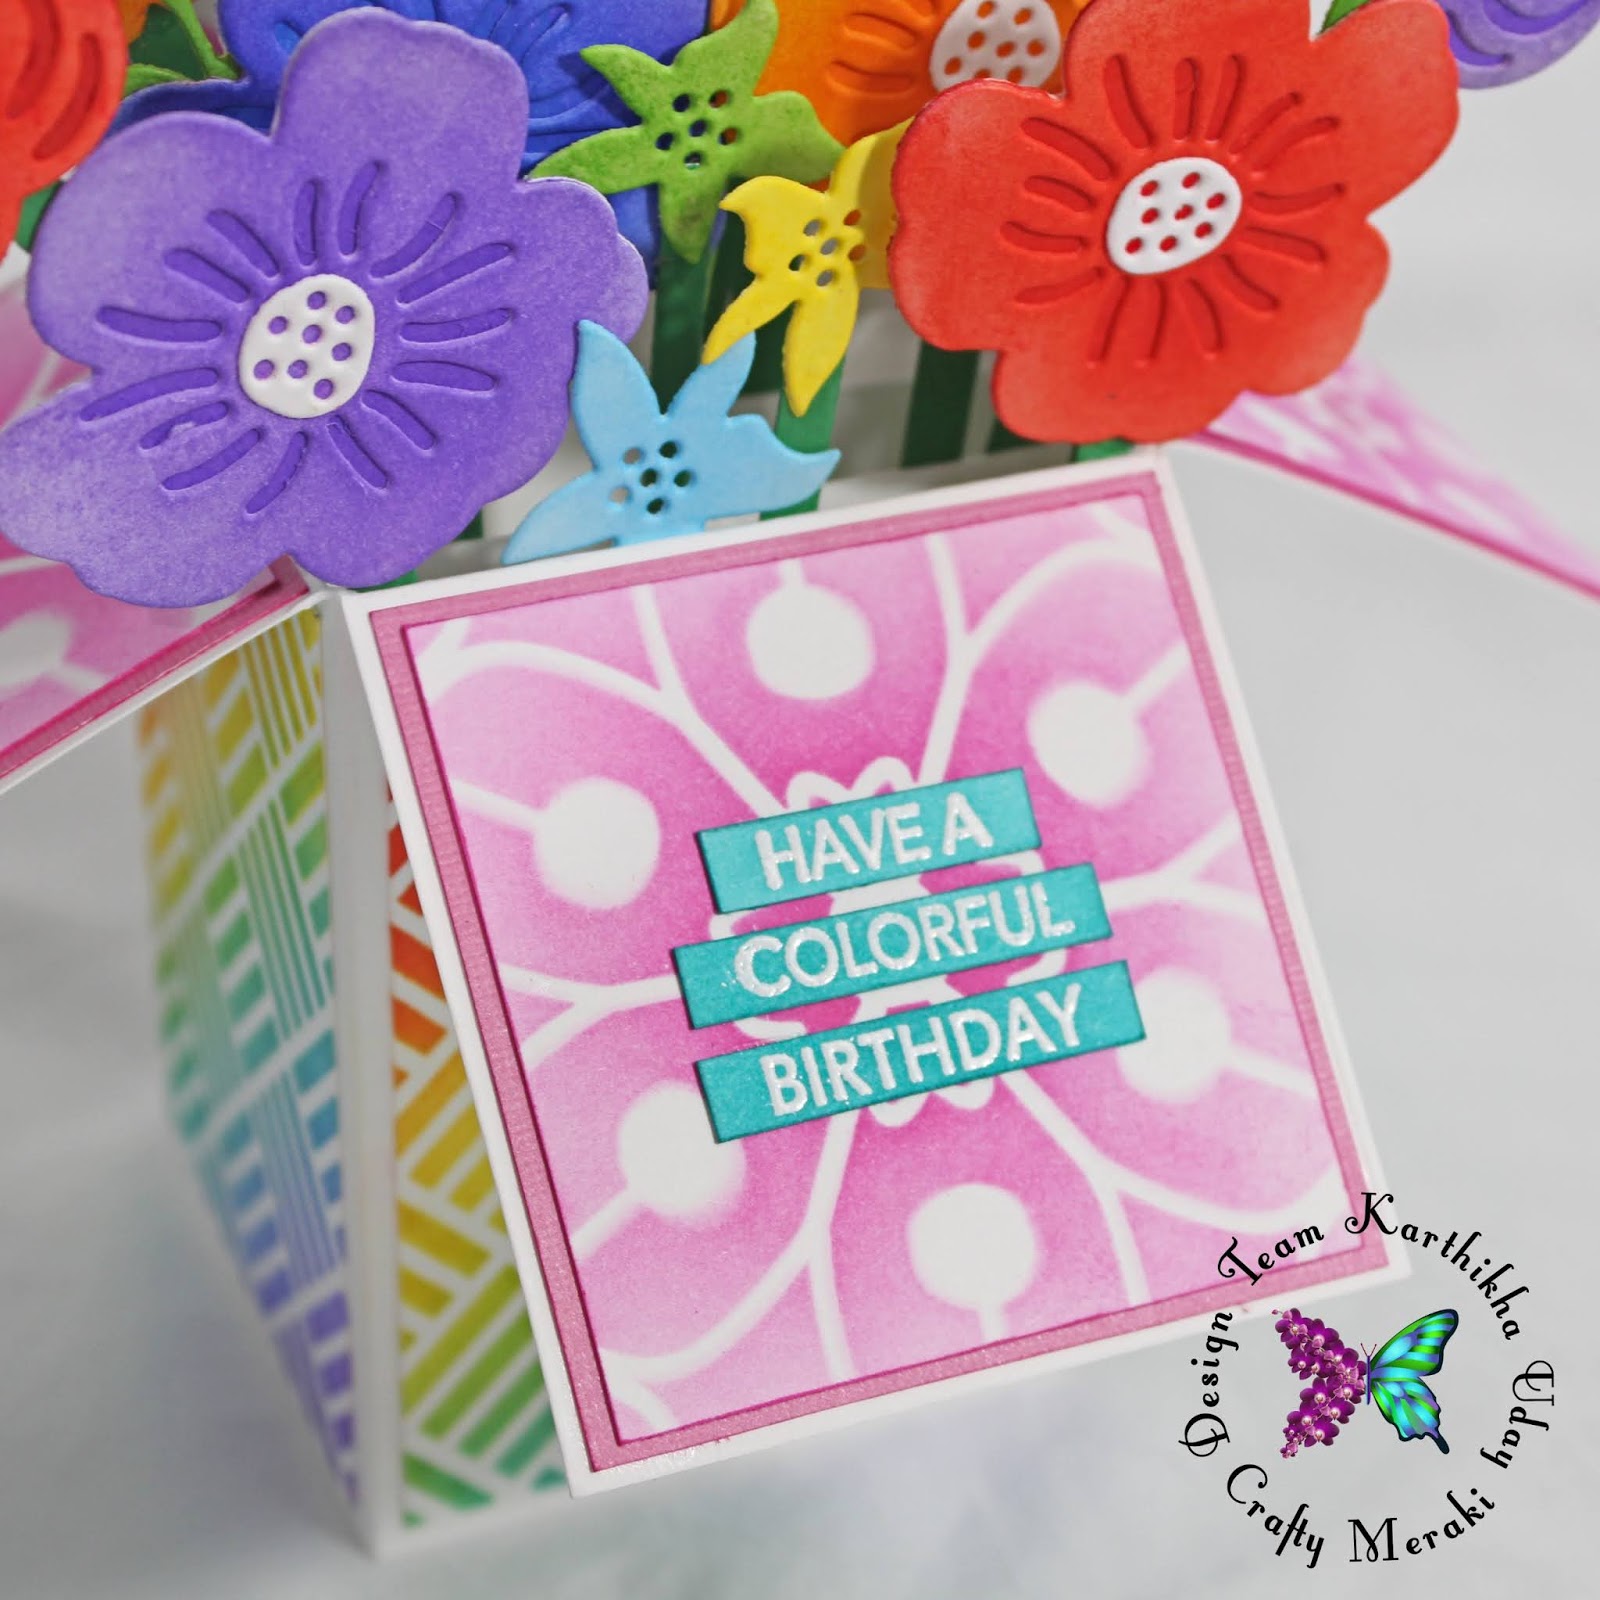
Step 8: Now it is time to decorate the sides of the box. I've used Altenew's Layered Medallion A stencil along with Picked Raspberry distress ink and made 4 squares for each of the 4 open flaps. I matted them with pink textured cardstock and adhered to the box flaps.
Step 9: For decorating the base of the box, I've used Altenew's Square Weave Pattern stencil and blended using the rainbow-colored distress inks. Prepare 3 of these panels for each of the sides.
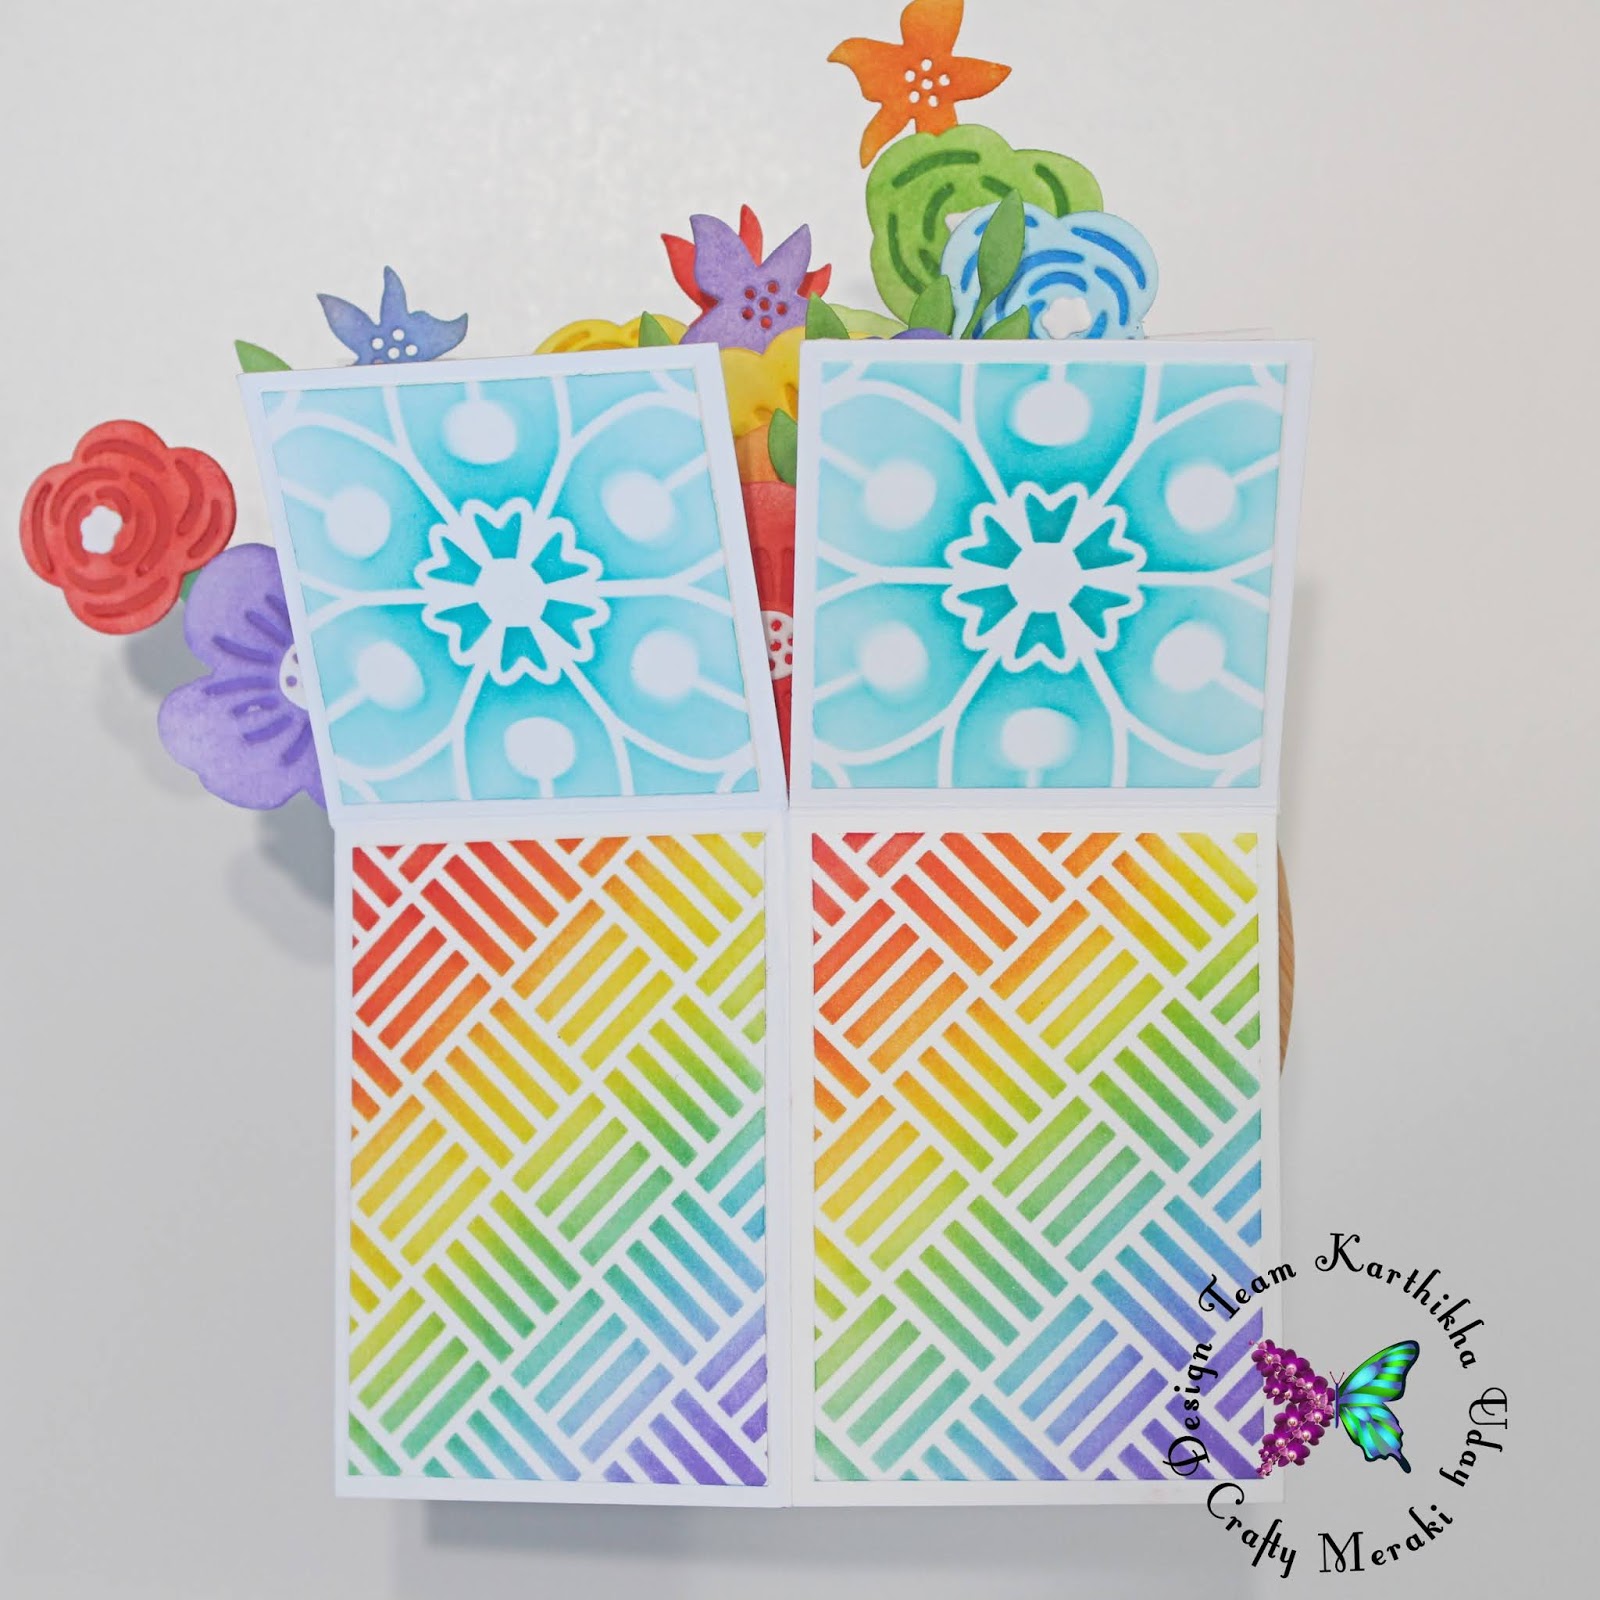
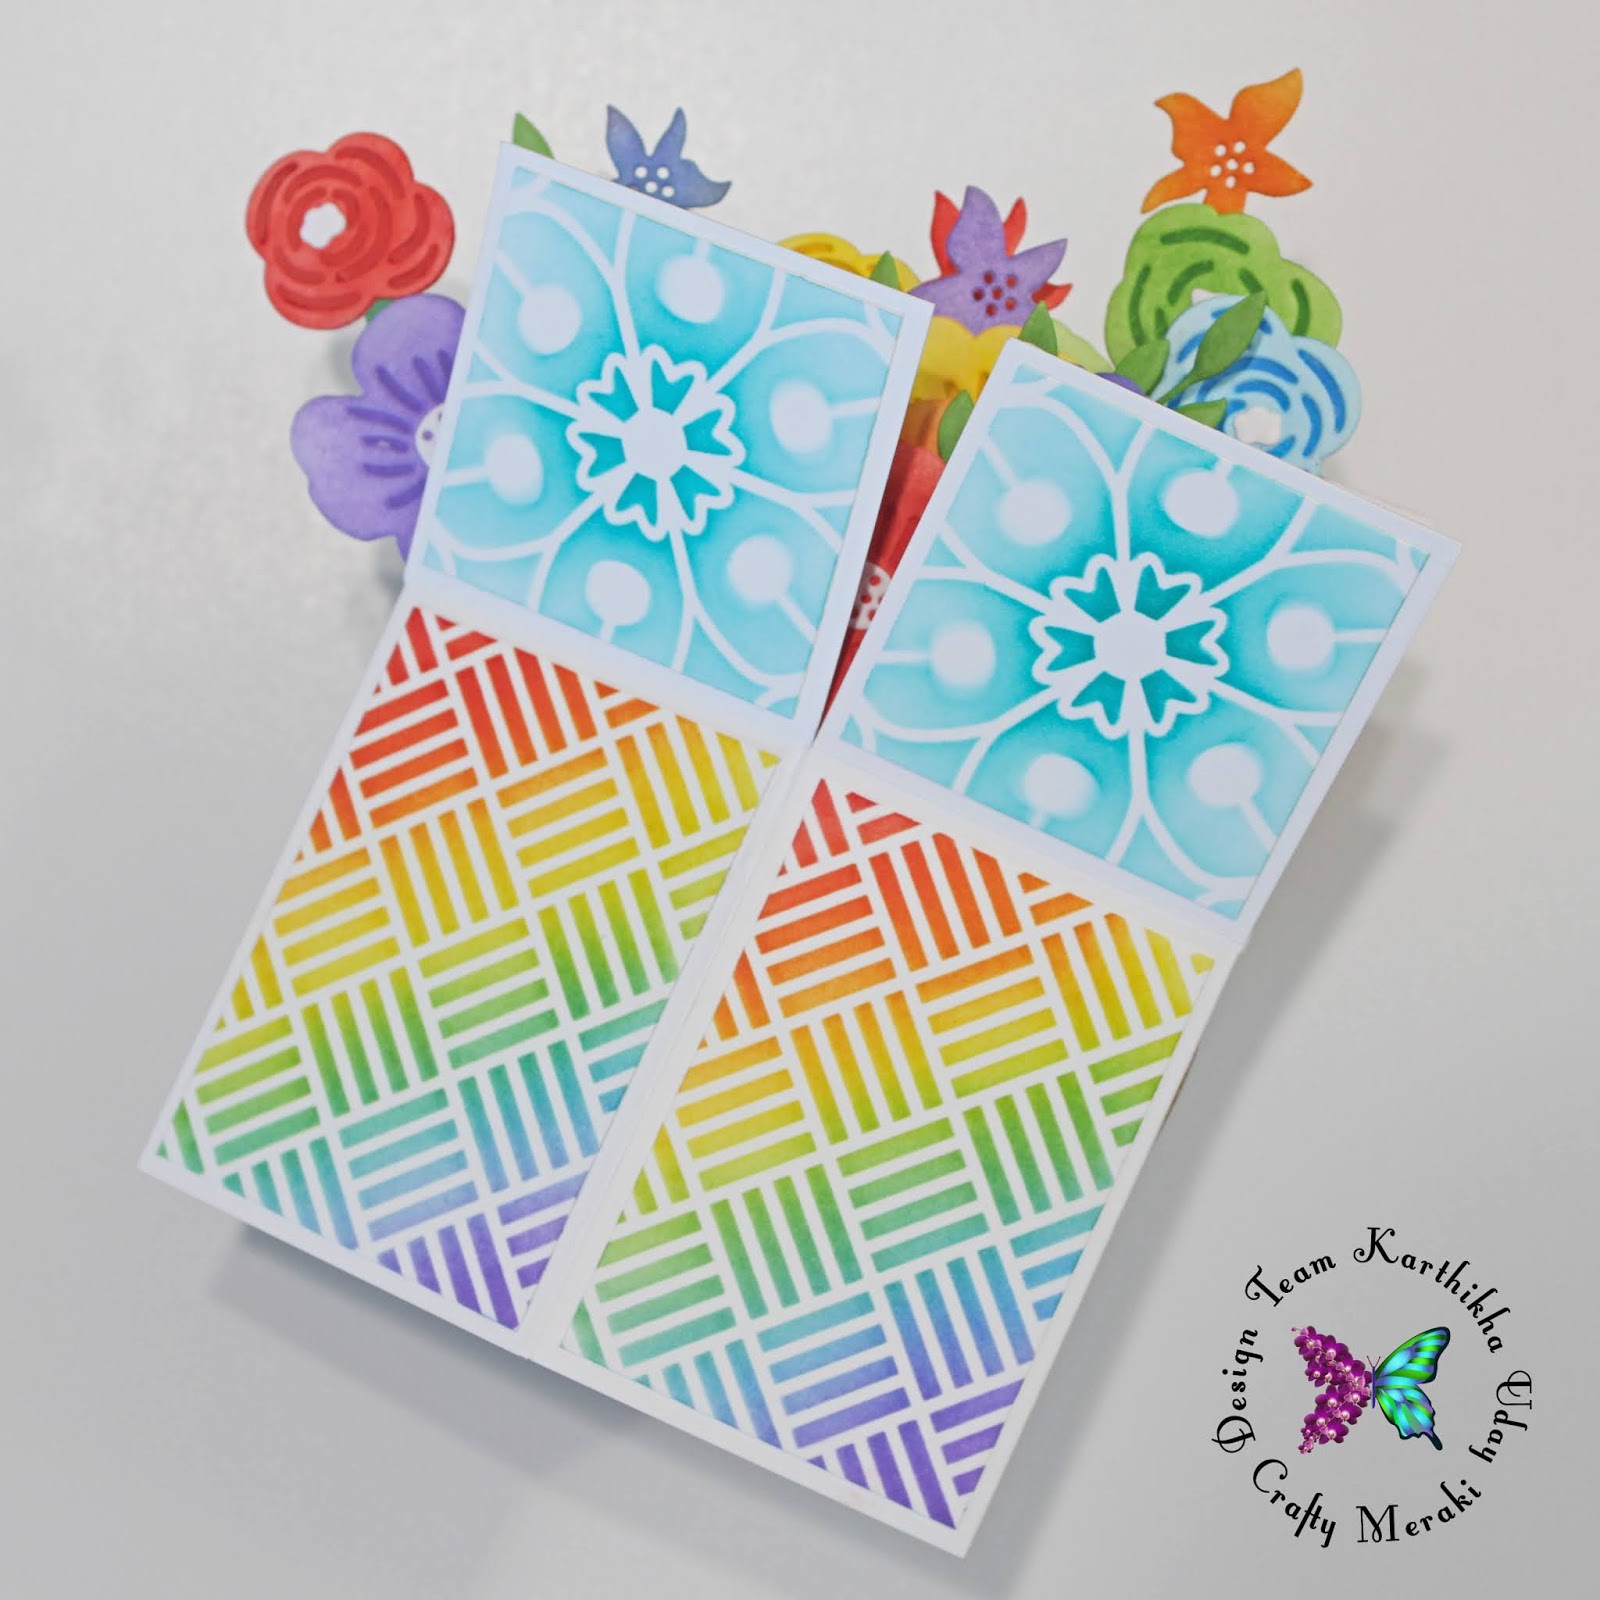
Step 10: For the flaps that are hidden when the box is opened, I've used the Layered Medallion stencil with Peacock Feathers distress ink.
Step 11: For the sentiment, I've white heat-embossed the words from different stamp sets onto white cardstock strips, and blended with Peacock Feathers ink. It is the emboss-resist technique.
Step 12: And now for the final surprise reveal! I have another card included in this popup card! Do you know where? Just right behind the flowers! I love to have some space to include a personal message, and with so much of details on the front, I utilized the back of the card too! :) I have another rainbow stencil panel over a long card base and attached to the back. Plenty of space to write a message, as well as keep it private while the card is being on display! :)

Thank you for stopping by, hope you like my creation! Do let me know your feedback! Have a nice day :)
10 comments
NATHAN
I lost my job few months back and there was no way to get income for my family, things was so tough and I couldn’t get anything for my children, not until a met a recommendation on a page writing how Mr Bernie Doran helped a lady in getting a huge amount of profit every 6 working days on trading with his management on the cryptocurrency Market, to be honest I was skeptical at first but I took the risk to take a loan, and I contacted him unbelievable and I was so happy I received a profit of $15,500 with an investment of $1500 within 7 days of trading , the most joy is that I can now take care of my family, i am just sharing my testimony on here. I don’t know how to appreciate your good work Mr. Bernie Doran, God will continue to bless you for being a life saver I have no way to appreciate you than to tell people about your good services. He can also help you recover your lost funds, For a perfect investment and good return on investment contact Mr Bernie Doran on Gmail : Berniedoransignals@gmail.com his telegram : IEBINARYFX or his whatsApp + 1 ( 424 ) 285 – 0682 tell him i referred you
Dave allen
My wife and I want to show profound gratitude and appreciation, ever since the pandemic things have always been very difficult for me and my family, I lost my job during the Covid19 stay at home pandemic and it was very difficult for me to secure a new job that was how life became terrible for me, But thank God for bringing this man into my life, Mr Bernie Doran. I read so many good reviews online on how he has been helping a lot of people both small business owners to gain financial income so I contacted him on WhatsApp and that was the day my life change began, I started with the lowest investment plan which was $1,500 and within a week I earned a profit of $18,500 on his trade management system, since then I have been making huge profits with the help of MR BERNIE DORAN, Now I can do basically anything I want for myself and my family, I just can’t thank you enough sir, may God continue to reward you. I highly recommend to everyone that needs financial aid, contact him on:
WhatsApp : +1(424) 285-0682 or his
G-mail : BERNIEDORANSIGNALS@GMAIL.COM
Karthikha Uday
Thanks a lot Mansi :) I did spend a lot of hours on this card, and patience depends on my mood :D
Mansi
Karthikha, you are a magician. And such patience to create this wondrous beauty. Mind officially blown! Kudos!
Karthikha Uday
Thank you so much Natasha :) <3
Leave a comment
This site is protected by hCaptcha and the hCaptcha Privacy Policy and Terms of Service apply.