
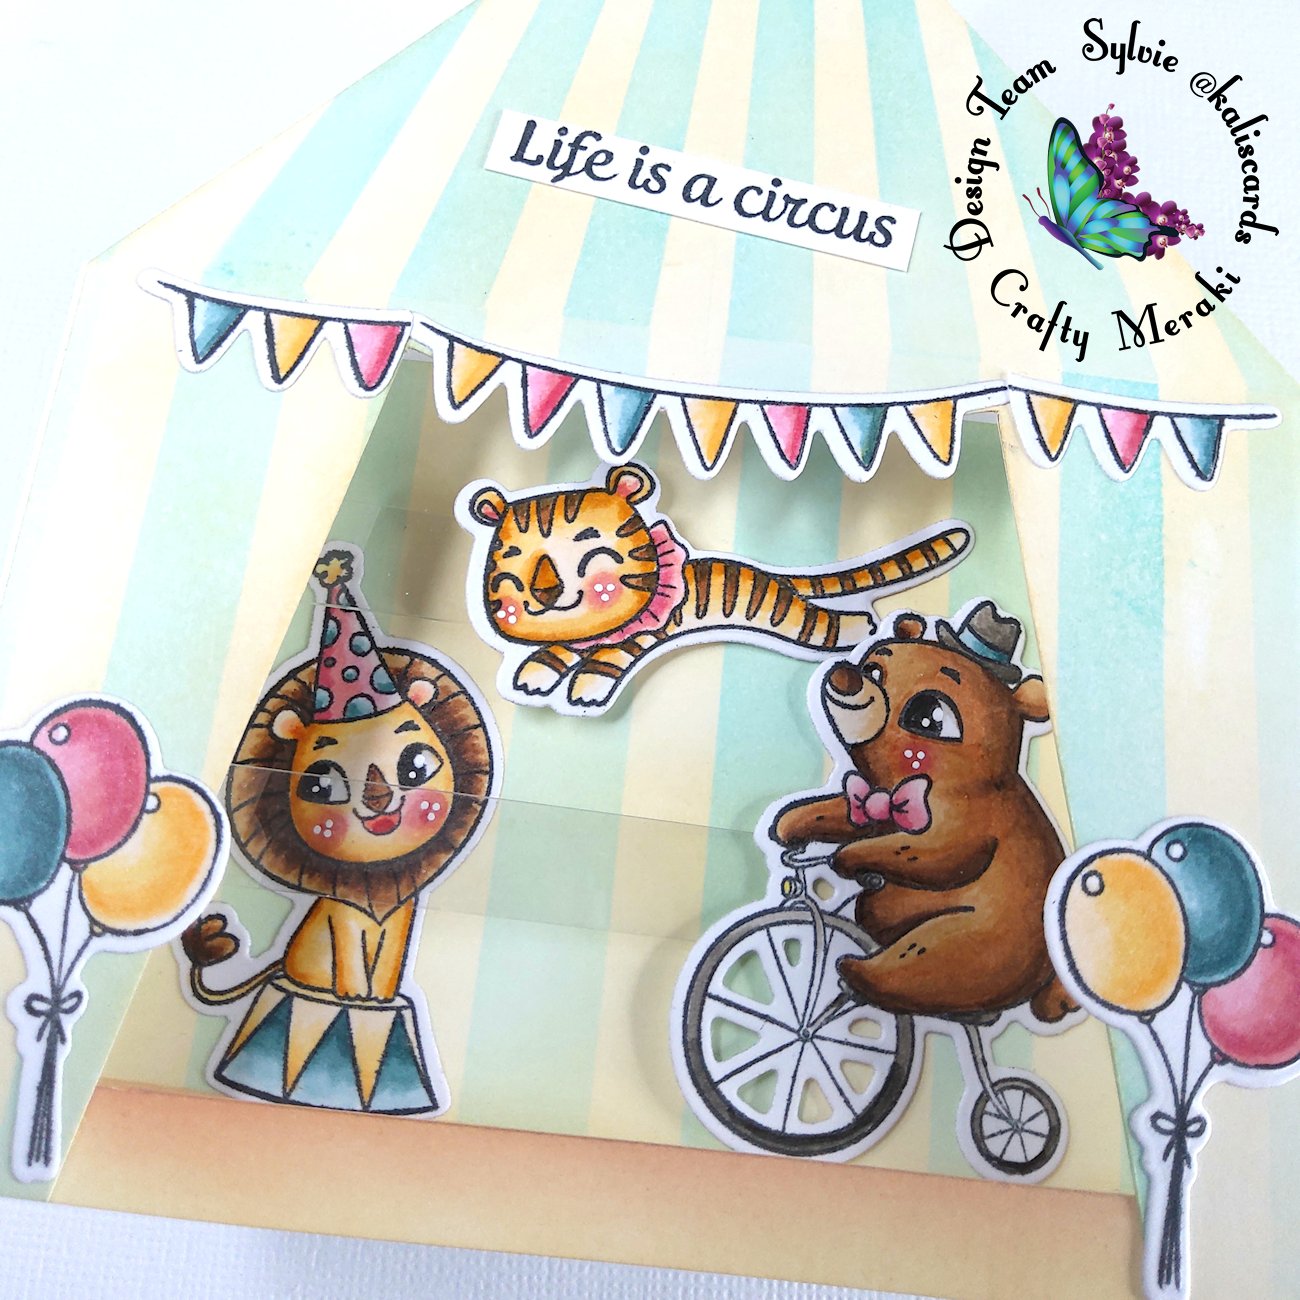
Today, I have a fun DIY big top popup box card featuring the new Crafty Meraki Roaring good time stamp set and following a tutorial by Jennifer McGuire to create the popup box card feature

To create this popup box card, I started by die cutting a piece of white cardstock 5 by 4 inches in size for my front panel
With the longer side vertically (sides) and shorter side horizontally (top/bottom), I'm measuring the center and drawing a line in the middle. I'm then measuring 2 3/4 from the bottom on either sides. From there, I'm drawing a line from the side to the top center of the panel. This will form the top of the tent and give a triangle shape to it

Then, from the bottom middle point of my panel, I'm measuring 2 1/2 inches and I'm drawing a curve line as shown on the picture. You can use the pennants die as a guide. This will form the top of the entrance. From the bottom center point, I'm measuring 1 1/2 on either sides and drawing a line from there to the extremities of the entrance top (the curve line!). This will form the sides of the entrance
With a ruler and craft knife, I'm cutting out the roof and entrance. For the top of the entrance, I used the pennants die as a guide again

Time to erase pencil marks!

Next, I'm blending Distress oxide Antique linen on the entire front

Then, I'm using masking tape to draw a limit between the roof and the rest of the panel (i.e., right below the triangle) and I'm placing the My Favorite Things Ray of light stencil above the front panel

I'm blending Distress ink Salvaged patina over the stencil
Next, I'll extend each stripe to the rest of the panel, using masking tape to isolate each stripe and mask the roof

All stripes are now done

Next, I'm cutting two pieces of white cardstock 6 by 2 3/4 inches in size for the pop-up and box card mecanism. On the largest side, I'm also scoring lines at 1/2 and 1 inches on either sides of the two panels.
On one of the panels, using the front panel as a guide, I'm drawing lines for the entrance, but leaving a thin strip at the bottom for the card stability. This will also be our ground

As I did for the entrance, with a craft knife and a ruler, as well as the pennants die, I'm cutting out the entrance, slightly larger than the front panel on the top and sides, since you do not want to see that panel (except for the ground) through the front panel

I then blended Distress oxide Antique linen and Vintage photo on the bottom strip to represent sand

On the back panel, I blended Antique linen everywhere (within the score lines, i.e., avoiding the two scored strips on either sides) and then, adding masking tape towards the bottom (about the same height as the front bottom strip), I'm blending Vintage photo to create the ground. On the upper part, I'm creating the same stripes, as on my front panel, with masking tape and Distress ink Salvaged patina

I'm letting all panels dry. Meanwhile, I'm stamping all the images from the Roaring good time set: the cute critters, as well as a couple pennants to decorate the entrance, a pair of balloons and the top of the big top image which I'll use to decorate the front panel.
I'm coloring the images with Copic markers, adding some highlights with my white gel pen. I'm then using the coordinating dies to die cut all images
I'm also stamping the sentiment on white cardstock and cutting it into a thin strip
I'm then gluing the images on my front panel, starting with one pennant above the entrance and the other pennant cut into 2 and placed on either side of the entrance. I'm also gluing the balloons on either side of the entrance. I'm then cutting out the top and flag of the big top to place them at the top of my home made big top. To finish the front panel, I'm gluing the sentiment on the roof
Then, to understand the basics in assembling a popup box card, you should watch this great tutorial by Jennifer McGuire: https://www.youtube.com/watch?v=rf7VUT_jN8I
To assemble the boxcard, I'm taking the two other panels and folding along the scored lines: for the front panel of the box card, I'm folding towards me for the first line on either side and then away from me for the second line. I do the same with the rear panel, with the back facing me (i.e., white cardstock facing me, not the tent decor with the stripes and sand ground)
I then added double-sided tape on the 4 outside flaps (i.e., between the edge and the first scored line), placing the double-sided tape inside the box card, i.e., at the back for my front panel, and on the side where I blended the stripes and sand for the rear panel
On the rear panel, I'm also gluing the fixed elements of my box card over the tent decor, in my case, the lion
I'm cutting 2 thin strips of acetate (don't worry about the length at this stage, just make sure it is longer than 4 inches) for the two critters that will be moving inside the box card, i.e., the bear and the tiger. Since I want both to move from right to left, I will place them on the extreme right of the acetate strip and will tape the strip of acetate to the left part of the panel. But don't tape anything yet at this stage!!
To decide how to place your critters, keep in mind that when you will pull on the sides to activate the popup mecanism, the critters will seem to move towards the center of the box card, so if you want to have the bear riding inside the big top, you actually need to tape the acetate to the left side, so that when pulling the sides, he will move towards the left
I then removed the release paper on the left side of the rear panel and placed the two acetate strips, one at the top, visible through the entrance opening, the other towards the bottom, slightly above the ground. I can then decide where to tape the critters on the acetate strip, making sure they remain visible when the card box is flat and when it is pulled. I can then simply remove the excess of acetate. If you are unsure about the placement, you can first assemble the card box and place the critters after
Once you have assembled the popup box card and placed the inside critter, you can glue the front panel on top of it and Ta-da!

It may seem difficult when reading all of these instructions, but I hope you'll find Jennifer's tutorial helpful as well and give this popup card box a try, or create your own big top-shaped card with or without the popup card box feature!
Thank you for bearing with me and hope to see next week again!
Leave a comment
This site is protected by hCaptcha and the hCaptcha Privacy Policy and Terms of Service apply.