
Hi everyone! Sindhu here. I'm so excited to introduce you the newest DT member of Crafty Meraki , Lidya.

Hello, my name is Lidya. I was born and raised in Indonesia. My husband and I moved to the US in 2013 and I’m currently based in Austin, Texas. I started card making about 2 years ago and found an amazing and inspiring community to share my work with on Instagram. I'm so thrilled and honored to join the Crafty Meraki design team! You can find me on Instagram @leeds_craftroom
Thank you for joining Crafty Meraki, Lidya! Now, let us see what she created for us today.
-------------------------------------------------------------------------------------
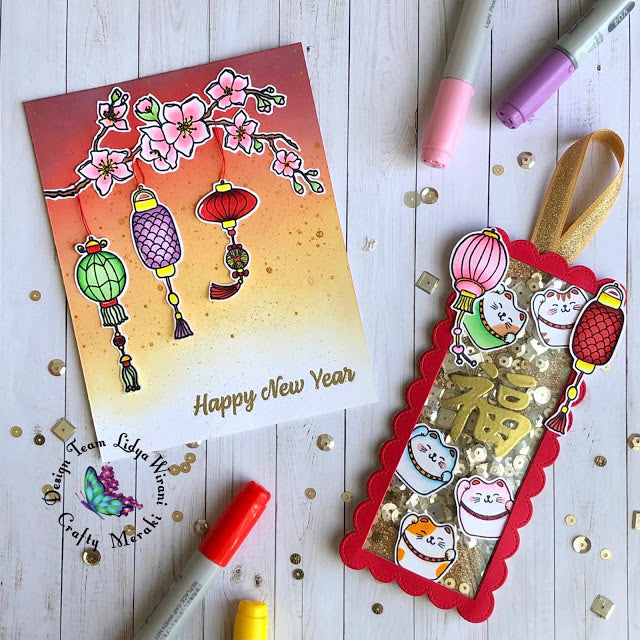
Hello crafty friends! This is Lidya here and I'm so excited to be sharing my first post with you for Crafty Meraki. Today, I'm sharing a Lunar New Year card using Year of The Ox stamp set.

First, I stamped the tree branch and the lanterns on a white card stock using Memento Black Ink Pad and then I colored them using Copic markers and fussy cut them out. For the background, I ink blended Distress Oxide Aged Mahogany, Fired Brick, Candided Apple, Scattered Straw and Dried Marigold. I splattered the background using gold shimmer watercolor paint from Kuretake Starry Colors.

I wanted to add a fun element to my card, I poked a hole on the lanterns and run a red string through it so I can hang the lanterns on the tree and it allows them to swing left and right. I adhere the string to the card base using glue dots. For the sentiments, I heat-embossed gold embossing powder on to the card base.

After finishing my card, I thought it would be nice to make a shaker tag that complements the card. For the tag, I stamped, colored and fussy cut out the lucky cats and the lanterns. Then, I cut a two red card stock using the Timeless Frames Slimline Dies. For this tag, I only use the outer scallop border, I cut both of them shorter and then adhered them together. I heat-embossed the word 福 using gold embossing powder onto a piece of acetate and use a gold glitter card as the back panel. Next, I adhered the acetate sheet onto the front panel, filled it with shaker element and assembled all panels together. I glued the image using double sided tape and added gold ribbon to the tag. Voila! the shaker tag is done!


I hope you like the card and the tag I've shared with you today. Thank you so much for stopping by! Have a wonderful day!
Crafty hugs,
Lidya
Instagram: @leeds_craftroom
Leave a comment
This site is protected by hCaptcha and the hCaptcha Privacy Policy and Terms of Service apply.