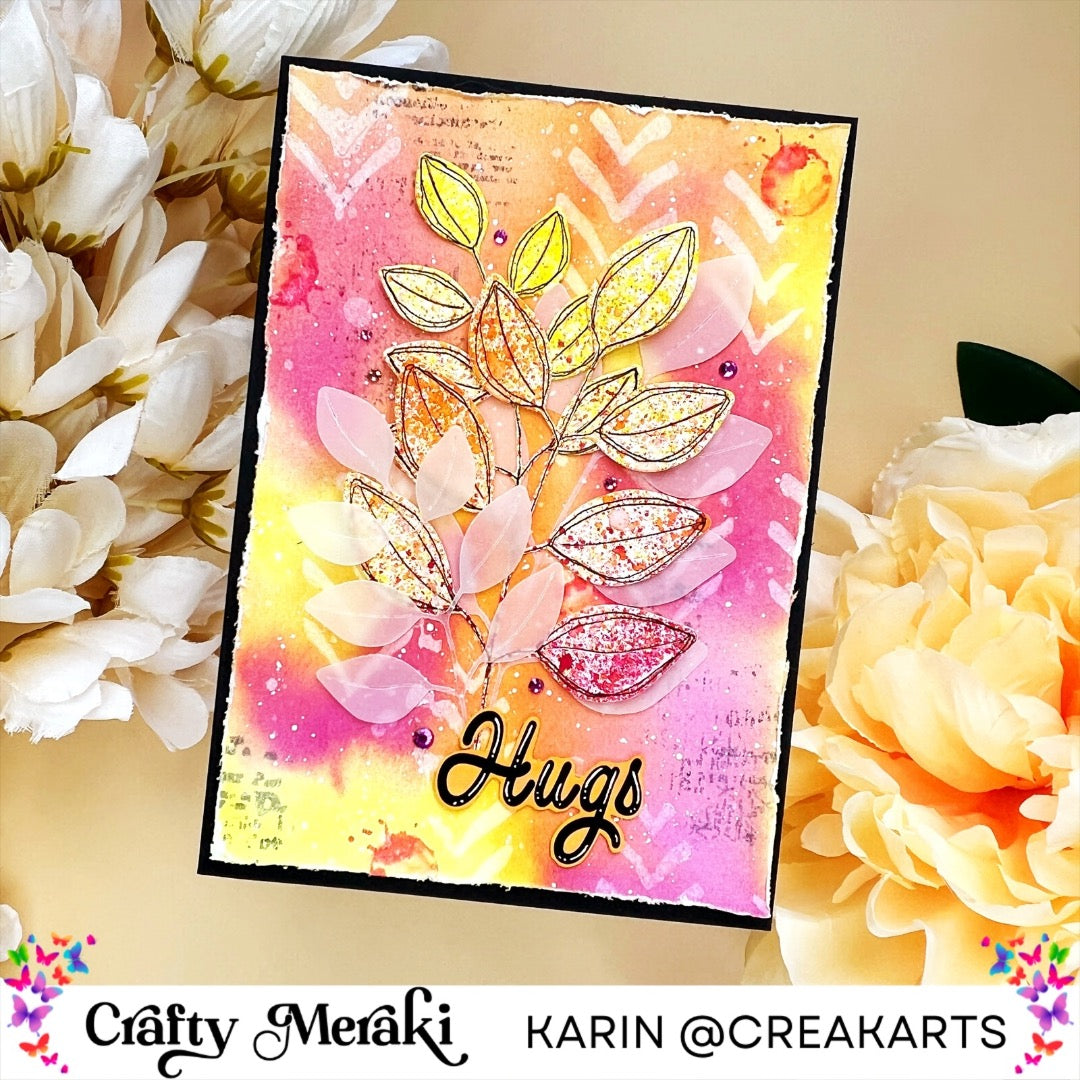
Hi crafty friends! Karin here from @creakarts I’m this months guest designer and will show you a new card every Saturday in June on this blog. This week is all about mixed media and I love it. My card features Laurel Leaf Meraki Para-Dies, EAP Gilded Greetings, Sahara Symphony Meraki Para-Dies and Meraki Divine Illusion Embellishments.
The first step is all about watercolours and spray paints. I watered my watercolour paper very well with a spray bottle before adding colours onto the paper. For my card I started with spray paints, pink flamingo, lemon zest and squeezed orange from Dylusions. I added every colour randomly onto the wet paper, if you add colour to wet paper you’ll see how beautiful the colour spreads out. Don’t be afraid that the colours are going to mix up because if you use colours that can be mixed up the end result will be awesome. If needed you can spray more water onto the paper during this process. I wanted a more vibrant pink and yellow colour so I also added watercolour in bright pink and yellow onto the sprayed parts. After I added all the colours I like to pick up the piece of paper and tilt it sideways and up and down to mix the colours a bit more. You can now air dry the piece of paper or use a heating tool to speed up the process.

I always like to add some splatters onto a mixed media piece and for this card I just wanted the splatters on the background of the paper. I used splatters white from Spellbinders. The more water you use while splattering the lighter and bigger the splatter will be. I personally try to use as less water as needed for the tiniest opaque splatters. I hold the brush in one hand and tap lightly with my other hand on the brush to let the paint fall down, if you do this with too much force you’ll get more elongated splatters, so be careful. I also dropped some water onto the paper with my hand to lift some of the ink. Spray with the spray bottle some water into your hand and flick it with your fingers onto the paper.
Next I added some little stamps that I coloured with Karin brushmarkers in magenta and warm grey. I used a teeny tiny bit of water onto the ink on the paper with a brush to let the colours flow a bit.

And now we’re getting somewhere. I took the Sahara Symphony die and ran it trough my machine with a simple piece of paper because I’m going to use it as a stencil for the background. I placed the cutter piece of paper onto my background and dabbed white gesso onto some places with a sponge. It’s all a bit random again, just go with the flow and see where you want to have a little more detail. When the panel is you can add distressed edges with a scissor or with a special paper distressed tool. Now the background is done!
Next step is making the Laurel Leafs pop that I’m going to place onto the background. I took another piece of watercolour paper and added the same spray paints as I used for the background but this time I didn’t wet the paper first. Without water the spray paints will leave a blotchy, speckled impression. I used one colour at a time and let it dry in between. When every colour is dry I added a little bit of water just to give it some extra dimension. Now this panel is finished I ran it through my die cutting machine with the Laurel Leaf dies on top of it. Because the colours are almost the same as the background I added lines to the leaves with a pigma micron 005 pen. After this all I thought it needed something more so I die cut the leaves again but now out of vellum paper. Now its time to add the leaves onto the background. I only glued the stems of the leaves, first starting with the biggest leaf in vellum than the biggest leaf in colour after this I added the little leaf in colour behind the stem of the biggest leaf in colour and the little one in vellum placed in front of it all.

One of the last steps to make this card is adding a sentiment. I used the EAP Gilded Greetings and cut out ‘hugs’ from the paper. It originally says ‘sending hugs’ but that was a bit too big for this card. I coloured the white background of the sentiment with Karin brushmarkers canary and skin2. With a Gellyroll pen 05 I added some highlights to the letters. After this I added the panel onto a double card in black with double sided foam tape. And to top it off I added a few Meraki Sparkle Divine Illusion embellishments.

Thank you so much for stopping by today. I hope I have inspired you with this card and you’ll have a lot of crafty fun with mixed media as much as I had making this card! Have a great weekend! ~Karin


61 comments
Jenny Savage
I am so happy to share this fantastic testimony of mine. My life has changed round completely in 48hours. I can see myself in the mirror and smile. I have confidence in myself and my abilities for the first time in ages. I have my boyfriend back in my life with the help of Dr Osofo. He said sorry 24 hours after the spell was created. He said he realised that he never really wanted to break up and he could not handle emotional baggage I was carrying around all the time. He said that he thought he was the negative influence on my life and thought it best to leave. He said it was hard that I kept talking about the past all the time. We have both forgiven each other. I have money in my pocket that is my own at last. (My compensation cheque came through. I was told it was months away. I am living proof of what Dr Osofo can do. I thank you so much Dr Osofo for the wonderful thing you did in my relationship. I am so happy now. With your help we were both able to see and speak the truth to each other. I never thought a spell could help a couple before. I am very pleased to contact you and initiate all this to happen. Anyone who has a relationship problem can contact Dr Osofo via email.
( osofo.48hoursolutioncenter@gmail.com )
his whatsAPP
+2349065749952
Fiorella García
Great chances to have your man back to you and your kids with the help of DR ISIKOLO.
My husband left me and our 2 kids for about 10 months. I went through a lot of pain. I tried everything possible to make him return back to me and to the kids but nothing worked out. It was really a stressful period for me because I never wanted to go through the heartbreak. i was told to get a love spell doctor contacted to help me out which i did i was lucky to get DR ISIKOLO Contact who was able to help me out, i contacted him and explained everything to him and complied with his procedures and he did the love reunion spell that brought back my husband to me and to his kids in 2 days. thanks so much DR ISIKOLO. I really appreciate what you have done for me. Here is his contact if you may required for it by solving your relationship problems, Text him via WhatsApp him on +2348133261196 or click on his webpage and see more details about his good works. https://isikolo-temple.com.
Lisa Linda
I want to use this medium to testify of how I got back my ex husband after divorce, i and my husband and I have been married for 8 years with 2 kids, we have been a happy family. Last year his behavior towards me and the kids changed, i suspected he was meeting another woman outside out marriage, any time i confronted him, he threatened to divorce me, i did all i could to make things right but all to no avail until i saw a post on a “love and relationship forum” about a spell caster who helps people to cast spell on marriage and relationship issues, when i contacted this spell caster via email, he helped me cast a reunion spell and my husband changed and came apologizing to me and the kids. Contact this great spell caster for your relationship or marriage issues via his
email (osofo.48hoursolutioncenter@gmail.com ) or Whatsapp him on +2349065749952 Good luck
Leave a comment
This site is protected by hCaptcha and the hCaptcha Privacy Policy and Terms of Service apply.