Hi everyone! Tiffany here. I'm so excited to share my first guest design for the Crafty Meraki blog! Today, I am featuring the beautiful Fluttering Feathers background stamp, illustrated by Alex Syberia, from this week's release.
Before starting my card, I conditioned my background stamp. It is really important to scuff it up a bit and remove any residue left over from the manufacturing process. This will allow ink to stick much better.
Pro tip: To condition your stamps, rub Versamark ink (or any clear, sticky embossing ink) over the stamp and wipe with a soft cloth. You can also rub an eraser over the stamp and wipe it off.
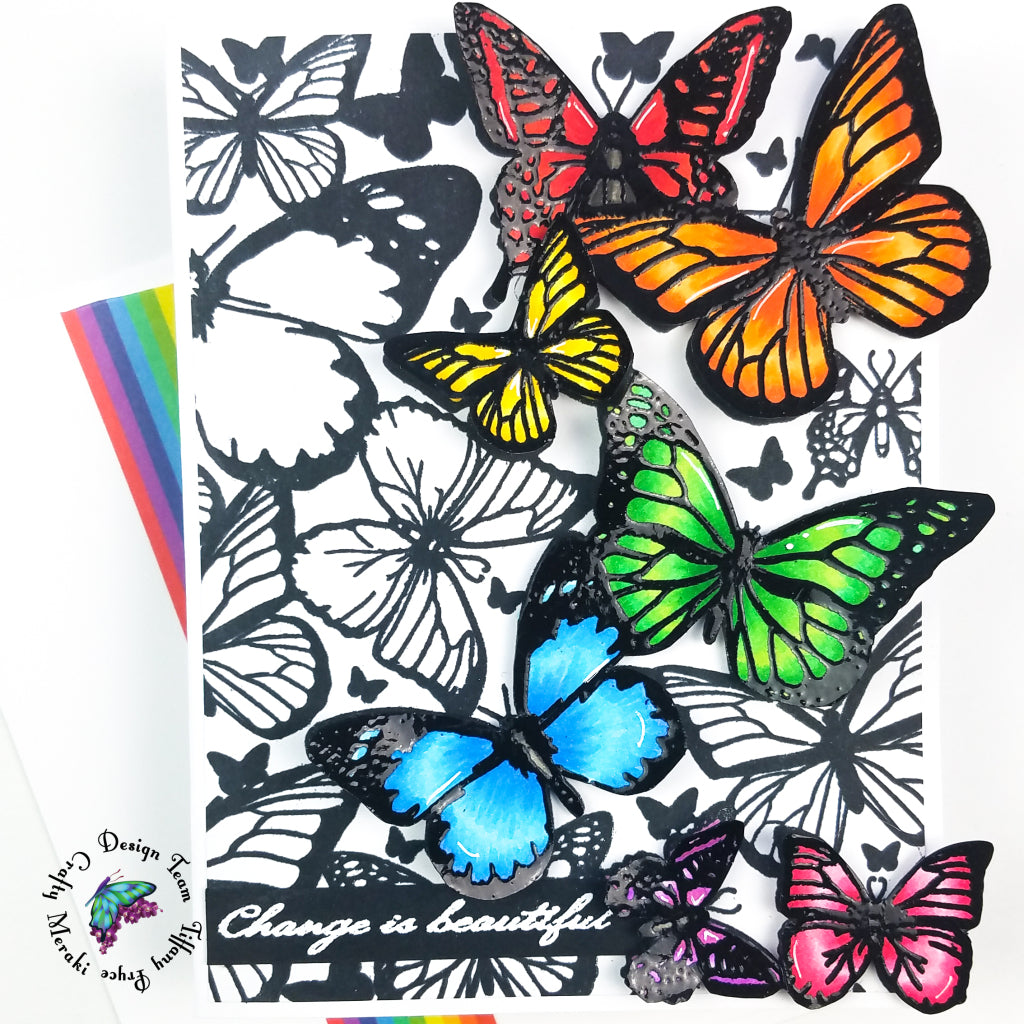
Background and card front. Once conditioned, I stamped the background stamp 3 times with copic marker-friendly, black ink on an A2 sized panel on heavyweight, white cardstock. After the ink dried, I colored seven butterflies along the right side of the panel (see copic colors below), added shimmer to each colored butterfly, and set the panel aside. I cut down this panel about 1/8 inch from each side to allow for a border.
On another piece of heavyweight, white cardstock, I stamped the background 2 more times with copic marker-friendly, black ink. I only inked the right side of the stamp making sure my paper was large enough to stamp the entire butterfly image. I colored the same seven butterflies along the right side of the panel in the same way as the first panel. I left my stamp in place in my stamp positioning tool because after coloring, I heat embossed the butterflies in black. Lastly, I fussy cut the seven butterflies and adhered them in the correct spot on top of my panel with foam tape. Most butterflies were adhered with a single layer of foam tape, and one was adhered with a double layer for extra interest and dimension. I slightly folded each butterfly's wings to reveal the color and sparkle underneath.
Design option: You can adapt this design to be a one layer card by simply stamping the first panel (as described above) in copic marker-friendly, black ink, and coloring the butterflies. You could skip stamping on a second panel and fussy cutting the dimensional butterflies.


Butterfly colors:
- Red: R29, R27, R24, R05
- Orange: YR18, YR68, YR16, YR12
- Yellow: Y18, Y15, Y13, Y02
- Green: G07, G05, G03, YG13
- Blue: B24, B04, B02, B01
- Purple: V05, V04, V000
- Pink: RV29, RV25, RV23, RV10
- Body: W8, W6, W4
Sentiment and final touches. After my card front was completed, I stamped one of the many beautiful sentiments that comes with this stamp set in embossing ink and heat embossed on a thin strip of black cardstock. Many of the sentiments are very fine, so make sure to apply light even pressure for the best impression. I finished my design with a few white gel pen details on the butterfly wings and added the card front to an A2 side-folding card base.
Thanks for joining me today! I hope you were inspired to try this new product from Crafty Meraki. Be sure to check the blog often as I will be back with more inspiration each week. Happy crafting!
Tiffany
IG: @ink.therapy.designs


2 comments
Kerry
Absolutely gorgeous! That double layer of colored butterflies is such a fab design concept! Easy to follow along with your tutorial as well. Thanks for sharing!
Melinda
This is so beautiful Tiffany!!! I love all the dimension you created. Great blog post.
Leave a comment
This site is protected by hCaptcha and the hCaptcha Privacy Policy and Terms of Service apply.