
Hello Crafty friends!
Today I have an unusual project to share: a notebook using the new Work of heart stamp set. The project consists of a laminated notebook cover with a handmade notepad inside and side pockets to tuck in some notes.
I won't lie; this kind of projects takes a little bit of time. Which I think makes it the perfect gift for a special teacher that you want to thank. My big brother is a teacher, so I know he will love it.
So, if you can't go into a lengthy project, you can still find a lot of inspiration in this project, creating a card with the same design or you could totally skip some parts of this tutorial... So don't walk away yet!
And the great thing about this one tutorial is that it comes with step by step photos accompanying the instructions!!!
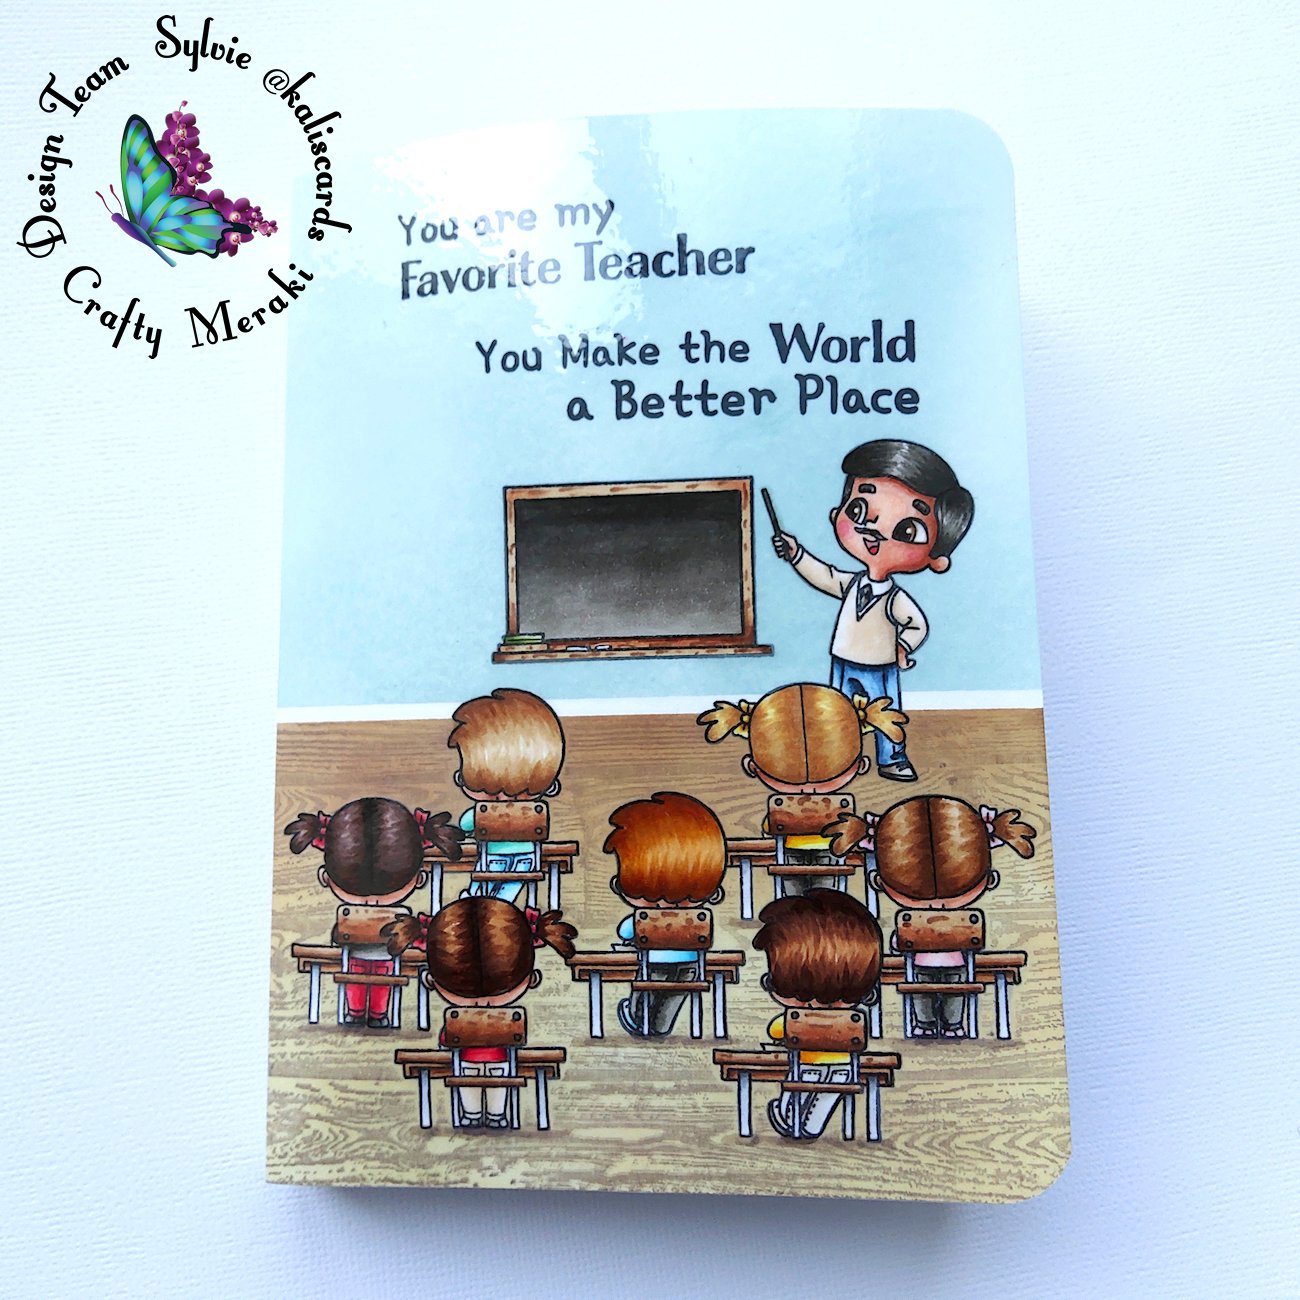
But first, let's have a look at the finished result:


So let's get started!
Handmade notepad
I'll start with creating the notepad. If you are not into mass production, I would recommend you skip this step and buy a regular notepad and create the notebook cover based on the size you went for.
To create my notepad, I took 25 A4 phototocopy sheets and cut them into 4. That will give me a 10.5 by 14.6 cm notepad with 100 sheets. The notepad will be about 1 cm thick.
If you'd like to push the school theme a bit further, you could use grid sheets and why not upcycle some unfinished notebooks of your kids!

There are several ways you can assemble a notepad, using a stapler if you have a real big one or gluing the top edge together with a flexible white glue like Mod podge. I don't have a big stapler and my last attempt with white glue did not resist over time so I thought of a more effective way, but probably more time consuming.
I used my We R Memory Keepers Dial trimmer which has a dotted-line blade to pre-cut each sheet around 1/4" from the top.


Next step is another part that you can totally skip, but if you are going for a handmade notepad, you may want to make it very personal and customize it! This is what I did by stamping a few images from the Work of heart stamp set, using a light ink to create a watermark


Next, I assembled each sheet together using a permanent adhesive roller. I wouldn't advise liquid glue as it would warp the paper. Double sided-tape would make the binding edge of your notepad too thick. To help me assemble the pages, I used a stamp positioner. My bone folder helped me burnish the adhesive. I also used an adhesive remover to rub-off any adhesive residue on the spine.

I will then create the cover for the notepad. I want to create a chalk board effect, so I'm cutting a panel from black cardstock measuring 10.6 by 17.2 cm and scored from the top at 1.5 and 2.5 cm. I also stamped and heat embossed the sentiment

To create the chalk board effect, I used a brush and white pigment ink to stain the edges of the notepad cover. Don't worry to apply too much or make a mess at the back of your cover. You can very easily remove the excess and clean with a baby wipe or wet cloth

I then added double-sided tape at the back of my cover, on the top edge, before the first crease...

... and adhered the front cover to the back of the notepad

I then added more double-slided tape at the back and adhered the notepad to a heavy cardstock cut to 10.6 by 14.7 cm

With this step, the handmade notepad is done!
Notebook cover
Next we will create the notebook cover
I cut the cover from heavy white cardstock to a 15.5 by 24.3 cm size. Using the masking technique, I stamped the images. You do not want to glue any die cuts on your cover if you are going for the laminated finish, as this would not look very nice. So one layer is the way to go here. Also, do not use any heat embossing either as it would smear going through the laminator.
Once I have stamped and masked all images, I will blend some Distress oxides in the background. I'm creating a line with masking tape above the floor of my class room and I'm also masking the spine of the cover book as I want to keep it white

I blended Distress oxide Antique linen on the entire bottom, then blended Tea dye from top to bottom and added a little Vintage photo at the top to create a shadow at the back of the scene
Next I'm using a wood background with dark chocolate ink to create a wooden floor effect. Totally optional if you don't have one in your stash.

I then removed the masking tape above the wooden floor and placed it a few millimeters above, thus leaving a white line that will act as a baseboard
I blended Speckled egg and a little bit of Salvaged patina at the bottom of the wall. Time to unmask and start coloring the images with Copic markers. You can use a white gel pen if you need to; that would work with the laminator

Once you're done coloring, check that you are happy with your coloring. No forgotten area, no mess to clean... after laminating, it will be too late for any correction!
To laminate the cover, I'm using my Minc on position 4 and laminating pouches

I then trimmed around the edges of the cover and I also used a corner trimmer to round the 4 corners. I then scored the two lines of the spine

Next we will create inside pockets to tuck in notes and slide in the note pad. This will have the other great advantage of hiding the Copic coloring that shows on the other side of the cover.
I searched for a school exam in relation with by brother's teaching domain, on the Internet, printed it on white cardstock having in mind that the final pocket would be 14 by 10.7 cm. I then trimmed the page to 13.7 by 15.5 cm
For the right side, I cut a panel from white cardstock 14.2 by 18.2 cm in size

On the fake exam, I stamped a few images from the Heffy Doodle Homeschool hero stamp set and then laminated the two panels.
I trimmed around the edges. I then used a circle and a line die from my stash to create a round notch at the top of the exam sheet and two lines on the page. This will be used to tuck notes in. On the white panel, I created a large notch to allow sliding in the notepad. Placement here is important as it should take into account the double-sided tape between the notepad and its back cover. Before adhering it to the notebook cover, verify that you can actually slide the notepad in and it fits well!!!
On the fake exam, I scored the left, bottom and right sides at 1.5 cm from the edge. On the white panel, I scored all four sides 1.5 cm from the edge. I then trimmed the corners, making sure the flaps would not overlap and create extra thickness. I then added double-sided tape on all flaps

Finally, I adhered the pockets inside the cover book. And finally slided in the notepad to finish the project.

Hope you liked this project. If you made it to this last line, thanks a bunch for stopping by and taking the time to read this post. Have a wonderful day!

Leave a comment
This site is protected by hCaptcha and the hCaptcha Privacy Policy and Terms of Service apply.